If your Fileinvite Login URL ends in fileinvite.com, please use this knowledge base instead.
Overview
Custom domain and email settings allow you to:
- Send emails from your organization's domain instead of FileInvite's default
- Display your custom domain in portal URLs for a branded experience
- Choose between FileInvite-managed email sending or your own SMTP server
Important: Custom domain configuration is integrated with Single Sign-On (SSO) setup. If your organization uses SSO authentication, both features must be configured together as they share the same infrastructure. For complete SSO setup instructions, see Setting Up Single Sign-On (SSO/SAML) in FileInvite.
Getting Started
Before configuring your custom domain:
- You must own or control the domain you want to use
- You need access to your domain's DNS settings
- Have your SMTP credentials ready (if using custom SMTP)
To begin setup, click the Settings icon (⚙️) in the bottom-left corner of the sidebar, select Advanced Settings from the Settings menu, then click Configure under the Custom Domain/Email tab.

Steps to Configure Custom Domain and Email
Step 1: Access the Configuration Page
- Click the Settings icon (⚙️) in the bottom-left corner of the sidebar
- Select Advanced Settings from the Settings menu
- Click the Configure button under Custom email and domain on the Custom Domain/Email tab
The configuration page opens showing the Custom Domain/Email panel. If DNS records have not yet been verified, a blue banner will display: "Custom domain/email settings won't be activated until all DNS records have been verified."
Note: The Advanced Settings page also contains SSO/SAML and MFA tabs. If your organisation uses Single Sign-On, both the Custom Domain/Email and SSO/SAML tabs must be configured together. See [Setting Up Single Sign-On (SSO/SAML) in FileInvite] for full details.

Step 2: Enter Your Custom Domain
- Under Set your custom domain, enter the domain you want to use (e.g., yourdomain.com). The page displays the instruction: "Please enter the domain you want to use, this must be a domain that is currently owned by you or your company."
- This domain must be currently owned by you or your company
Note: The domain you enter will be visible in portal URLs and email addresses sent to borrowers.

Step 3: Choose How You Want to Send Emails
Under Choose how you want to send emails, select one of the following options. Note the instructional text: "Emails can be sent either on your behalf by FileInvite, or you can configure an SMTP account for FileInvite to send emails using your own provider. If you want to use an SMTP account please ensure your mailing provider supports bulk mailing."
Option 1: Allow FileInvite to Send Emails on Your Behalf (Recommended)
- Select Allow FileInvite to send out emails on your behalf
- Enter the email address you'd like FileInvite to use when sending emails (e.g., documents@yourcompany.com)
- Click Save Changes
This is the simpler option—FileInvite handles email delivery while sending from your custom address.
Option 2: Set Up an SMTP Account

- Select Set up an SMTP account
- Enter the email address you'd like to use
- Enter your SMTP server details:
- Host: Your SMTP server address (e.g., smtp.gmail.com)
- Port: Port number (commonly 587 for TLS or 465 for SSL)
- Username: Your SMTP authentication username
- Password: Your SMTP authentication password
- Check Verify server SSL Certificate if your server uses SSL/TLS
- Click Send Test Email to verify your configuration
- Click Save Changes
Note: We don't support Port 25. Ensure your SMTP server allows connections from FileInvite's IP addresses.
Step 4: Add DNS Records
After saving your configuration, FileInvite generates DNS records that you must add to your domain's DNS settings.
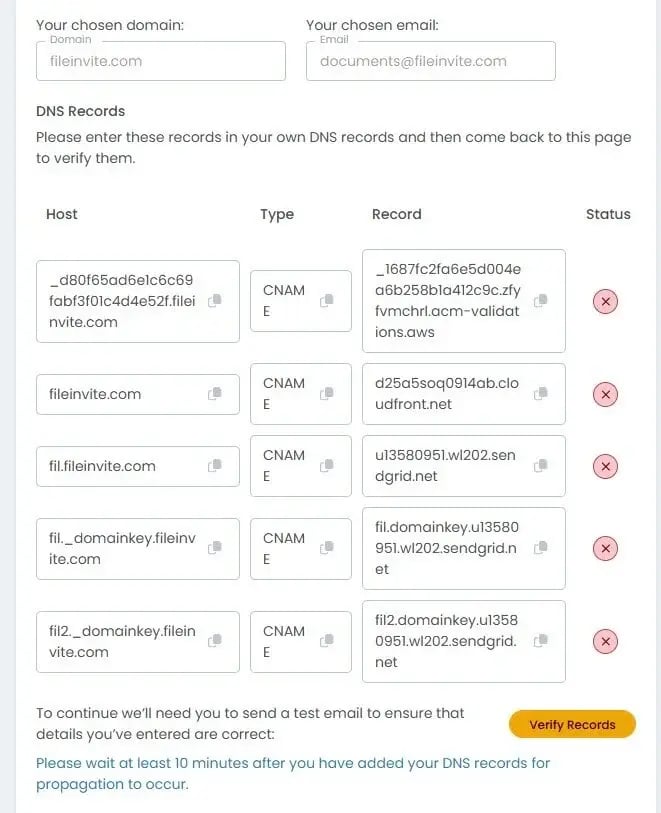
- Click Click to refresh if you see "DNS records are being generated. Please check back in 1-2 minutes"
- Review the DNS records table showing:
- Host: The DNS record name
- Type: Record type (typically CNAME)
- Record: The value to enter in your DNS settings
- Status: Current verification status
- Log in to your domain hosting service (e.g., GoDaddy, Cloudflare, Route53)
- Navigate to DNS settings or DNS management
- Add each record exactly as shown in the table
- Copy values using the copy icons to avoid errors
Important: Custom domain/email settings won't be activated until all DNS records have been verified (shown in blue notification banner).
Step 5: Verify DNS Records
After adding DNS records to your domain:
- Wait at least 10 minutes for initial DNS propagation
- Return to the FileInvite configuration page
- Click Verify Records button
DNS Propagation Timing:
- Initial propagation: 10 minutes minimum
- Full propagation: Up to 48 hours globally
- Most records: Propagate within 1-2 hours
If verification fails after 10 minutes, wait longer (up to 48 hours) and try again. DNS propagation time varies by DNS provider and geographic location.
DNS Configuration Requirements
The DNS records required depend on your configuration:
For Custom Domain with Email Only
DKIM Record (Email Authentication):
- Verifies FileInvite is authorized to send emails from your domain
- Type: TXT or CNAME record (depending on your DNS provider)
- Prevents your emails from being marked as spam
- Generated automatically during configuration
For Custom Domain with SSO
If your organization uses Single Sign-On, two additional DNS records are required:
1. AWS Certificate Manager Record
This allows FileInvite to issue SSL certificates for your custom domain:
- Purpose: Provides security authorization for certificate issuance
- Type: CNAME record
- Required for: HTTPS/SSL functionality on your custom domain
2. CloudFront Distribution CNAME
This redirects your custom domain traffic to FileInvite's infrastructure:
- Purpose: Routes traffic through FileInvite's content delivery network (CDN)
- Type: CNAME record
- Required for: Custom domain portal access
Note: All DNS records must be in place before your custom domain and SSO will function properly. FileInvite provides the specific values for these records during the configuration process.
SSL Certificate Management
When you configure a custom domain with the required DNS records, FileInvite uses AWS Certificate Manager to handle SSL certificates automatically:
Automatic Certificate Handling
- No manual renewals required: Certificates renew automatically before expiration
- Prevents outages: Eliminates downtime from expired certificates
- Zero maintenance: No customer action needed for ongoing certificate management
Note: Previous manual certificate processes often caused outages due to expired certificates. The automated AWS approach eliminates this risk.
Your Organization Retains Control
You maintain full control over FileInvite's certificate authority:
- Remove access anytime: Delete the AWS Certificate Manager DNS record to immediately revoke FileInvite's certificate authority
- Immediate effect: Removal causes an immediate outage (HTTPS connections will fail)
- Complete control: You determine when and how FileInvite can issue certificates for your domain
Important: Do not remove DNS records while your custom domain is active. This will cause an immediate service outage for your custom domain and SSO access.
Restoring Default Settings
To revert to FileInvite's default domain and email settings:
- Navigate to Settings (⚙️) > Advanced Settings > Custom Domain/Email tab
- Click Restore Default in the top-right corner of the Custom email and domain panel
- Confirm the restoration
Note: You can reconfigure your custom domain at any time by following the setup steps again.
Best Practices
💡 Best Practices for Custom Domain Setup:
- Coordinate with IT team: Ensure your DNS administrator is available during setup to add records promptly
- Plan for propagation time: Schedule custom domain setup when you can allow 24-48 hours for DNS propagation
- Test before rollout: Verify email sending and custom domain access work correctly before announcing to your team
- Document your configuration: Keep records of all DNS entries, email addresses, and SMTP settings for future reference
- Monitor email deliverability: After setup, send test emails to various email providers (Gmail, Outlook, etc.) to confirm delivery
- Keep DNS records active: Never remove DNS records while your custom domain is in use—this causes immediate outages
- Consider SSO integration: If planning to use SSO, configure both features together to avoid duplicate setup work
- Use copy icons: Always use the copy icons next to DNS record values to avoid transcription errors
- Test SMTP before saving: Use the "Send Test Email" button to verify SMTP credentials before saving configuration
Troubleshooting
Verification Fails After Adding DNS Records
DNS records not yet propagated:
- Wait longer (up to 48 hours) for DNS propagation
- Use a DNS checker tool (like whatsmydns.net) to verify your records are visible globally
- Confirm you added the record to the correct domain (not a subdomain)
Incorrect DNS record format:
- Verify you copied the entire DNS record value provided by FileInvite
- Check for extra spaces or missing characters
- Ensure the record type (TXT, CNAME) matches what FileInvite specified
- Some DNS providers require a trailing dot (.) at the end of CNAME values
Wrong DNS record location:
- Verify you added records to your root domain's DNS settings
- Ensure you're not adding records to a subdomain's settings
- Check that you have appropriate permissions in your DNS management console
Custom Domain Not Working After Verification
For email sending issues:
- Verify the DKIM record is active and correctly configured
- Check your email sending address is correct
- Confirm SPF records (if applicable) include FileInvite's sending servers
- Send test emails to multiple email providers to test deliverability
- Check spam folders if test emails aren't arriving
For custom portal domain issues:
- Verify both the AWS Certificate Manager record and CloudFront CNAME are in place
- Allow up to 30 minutes after DNS verification for SSL certificate issuance
- Clear browser cache and try accessing the custom domain in an incognito/private window
- Check that SSO is properly configured if your organization uses SSO
- Verify the custom domain URL is using HTTPS (not HTTP)
SMTP Authentication Errors
If using a custom SMTP account:
Incorrect credentials:
- Verify your SMTP credentials (host, port, username, password) are correct
- Test credentials using an email client (Outlook, Thunderbird) before entering in FileInvite
- Check for typos or extra spaces in credentials
Connection issues:
- Confirm your SMTP server allows connections from FileInvite's IP addresses
- Verify the port number supports your required encryption method (TLS/SSL)
- Common ports: 587 (TLS), 465 (SSL)
- Port 25 is not supported
SSL/TLS issues:
- If using SSL/TLS, ensure "Verify server SSL Certificate" is checked
- Verify your SMTP server's SSL certificate is valid and not expired
- Some servers require specific security protocols (TLS 1.2 or higher)
Provider-specific issues:
- Gmail: Enable "Less secure app access" or use App Passwords with 2FA
- Office 365: May require specific authentication settings or app passwords
- Other providers: Check documentation for bulk email sending requirements
DNS Records Show Red X Status
Possible causes:
- DNS records not yet propagated (wait 10 minutes to 48 hours)
- Incorrect record value entered in DNS settings
- DNS record added to wrong domain or subdomain
- DNS provider requires different record format
Solutions:
- Wait additional time for propagation
- Use copy icons to re-copy record values and verify they match in your DNS
- Check DNS provider documentation for their specific record format requirements
- Contact FileInvite support if records remain unverified after 48 hours
Important Notes
Activation Timing: Customizations will activate only after configuration is complete and all DNS records are verified. You'll see a blue notification banner at the top of the page until verification is complete.
Email Provider Requirements: If using SMTP, ensure your email provider supports bulk mailing and doesn't rate-limit outgoing messages. Some providers (like personal Gmail accounts) have daily sending limits.
Custom Domain and SSO: Custom domain configuration and SSO setup must be completed together in the current system architecture. You cannot configure these features separately.
DNS Record Maintenance: Keep your AWS Certificate Manager and CloudFront CNAME records active in your DNS settings. Removing these records will immediately cause an outage for SSO and custom domain access.
Regional Considerations: The screenshots and examples in this article may show US region URLs. If your organization is in the Australia or Europe region, your URLs and records will reference au.fileinvite.app or eu.fileinvite.app instead of us.fileinvite.app.
Related Articles
- Setting Up Single Sign-On (SSO/SAML) in FileInvite - Required if your organization uses SSO authentication
- Adding Your Branding - Customize your organization's portal appearance
- Borrower Email Notification - Learn about email notifications sent to borrowers
🎉 Success! Your custom domain and email address are now configured. Borrowers will see your organization's branding in all email communications and portal URLs. 🎉
Need Help?
If you encounter issues during custom domain configuration or need assistance with DNS setup, contact FileInvite support for guidance.