If your Fileinvite Login URL ends in fileinvite.com, please use this knowledge base instead.
Overview
FileInvite supports SAML 2.0-based Single Sign-On, enabling you to manage user authentication through your existing identity provider (such as Okta, Azure AD, or Google Workspace). When SSO is enabled, it applies to all members within your organization.
Key Benefits:
- Centralized user authentication through your identity provider
- Improved security with your organization's authentication policies
- Simplified user management and access control
- Reduced password fatigue for team members
Getting Started
Before configuring SSO, you'll need:
- Administrative access to FileInvite's Organization Settings
- Administrative access to your identity provider (IdP)
- Ability to manage your organization's DNS records
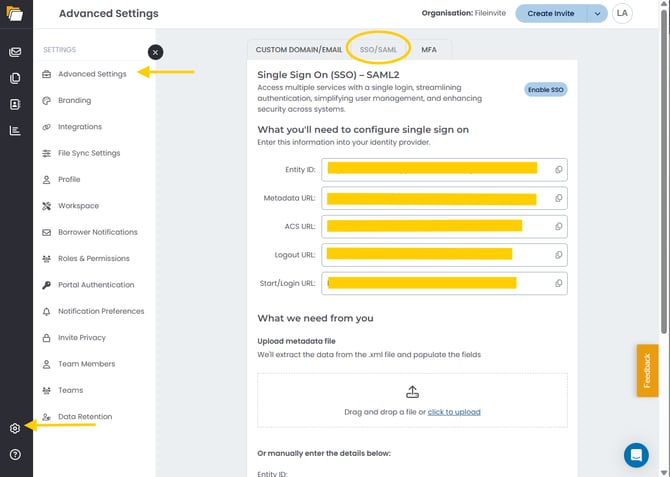
Note: SSO configuration is available only to the organization owner. Navigate to Settings > Advanced Settings> SSO/SAML to access the configuration page.
What You'll Need to Configure Single Sign-On
FileInvite provides the following information that you'll need to enter into your identity provider:
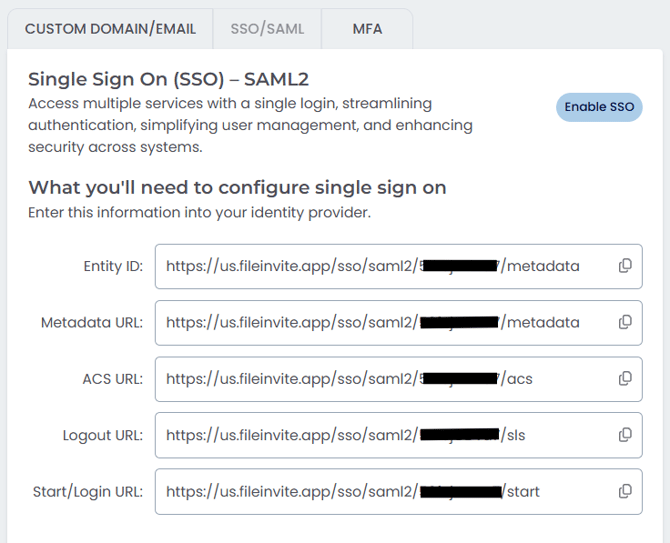
Note: These URLs are unique to your organization and can be copied directly from the SSO/SAML configuration page using the copy icons next to each field.
ACS URL (Assertion Consumer Service URL): The endpoint your identity provider sends the SAML response to after authentication. This must be entered exactly as shown on your SSO/SAML configuration page.
The Login URL and ACS URL must both be entered into your identity provider exactly as they appear on your FileInvite SSO/SAML configuration page. A mismatch in either value will cause authentication to fail.
Configuration Methods
You can configure SSO using either of two methods:
Method 1: Upload Metadata File (Recommended)
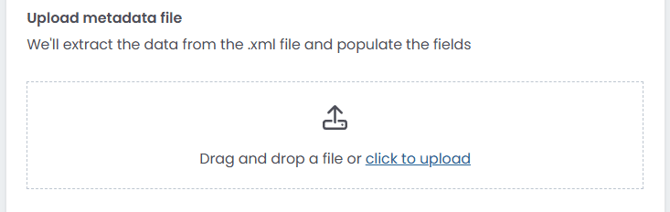
The fastest way to configure SSO is by uploading your identity provider's metadata XML file:
- Click the Settings icon (⚙️) in the bottom-left corner of the sidebar
- Select Advanced Settings from the Settings menu
- Click the SSO/SAML tab at the top of the page
- Under What we need from you, locate the Upload metadata file section
- Click click to upload or drag and drop your identity provider's .xml metadata file
- FileInvite automatically extracts and populates the required fields
- Click Save Changes
Note: The metadata file contains all necessary configuration information, including Entity ID, Certificate, Login URL, and Logout URL.
Method 2: Manual Configuration
If you prefer to enter details manually or don't have a metadata file:
Accessing SSO Settings
- Click the Settings icon (⚙️) in the bottom-left corner of the sidebar
- Select Advanced Settings from the Settings menu
- Click the SSO/SAML tab at the top of the page
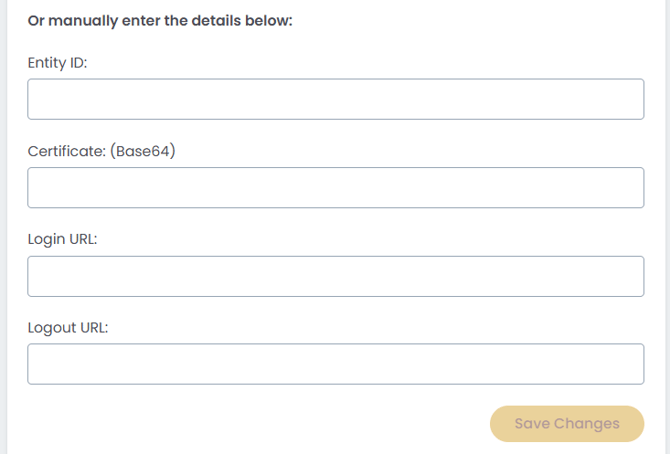
- Manually enter the details below
- Enter the following information from your identity provider:
- Entity ID: The unique identifier for your identity provider (provided by your IdP)
- Certificate (Base64): The X.509 certificate from your identity provider in Base64 format. Paste the entire certificate including the BEGIN and END lines.
- Login URL: The SAML 2.0 endpoint where FileInvite sends authentication requests
- Logout URL: The endpoint for single logout (SLO) functionality
4. Click Save Changes
DNS Configuration Requirements
Important: Custom domain and SSO setup must be configured together. This is a standard approach for FileInvite customers and both features use the same configuration interface.
To complete SSO setup with a custom domain, two DNS entries are required:
1. AWS Certificate Manager Record
This record allows FileInvite to issue SSL certificates on your organization's behalf:
- Purpose: Provides security authorization for certificate issuance
- Type: CNAME record (provided during setup)
- Management: Add this record to your organization's DNS settings
2. CNAME Record to CloudFront Distribution
This record redirects your custom domain traffic to FileInvite's infrastructure:
- Purpose: Routes traffic through FileInvite's content delivery network (CDN)
- Type: CNAME record (provided during setup)
- Function: Distributes the FileInvite interface to your users
Both DNS records must be in place before SSO and custom domain functionality will work. FileInvite will provide the specific values for these records during the configuration process.
Certificate Management
Automatic Certificate Handling
Once your DNS records are in place, AWS Certificate Manager handles SSL certificates automatically:
- No manual renewals required: Certificates renew automatically before expiration
- Prevents outages: Eliminates downtime from expired certificates
- Zero maintenance: No customer action needed for ongoing certificate management
Previous manual certificate processes often caused outages due to expired certificates. The automated AWS approach eliminates this risk.
Your Organization Retains Control
You maintain full control over FileInvite's certificate authority:
- Remove access anytime: Delete the AWS Certificate Manager DNS record to immediately revoke FileInvite's certificate authority
- Immediate effect: Removal causes an immediate outage (HTTPS connections will fail)
- Complete control: You determine when and how FileInvite can issue certificates for your domain
Enabling SSO
After completing the configuration:
- Verify all information is correct
- Click Enable SSO button in the top-right corner of the SSO/SAML page
- Test the SSO login flow with your own account before rolling out to all users
- Communicate the change to your team members
Important: Once SSO is enabled, all organization members must authenticate through your identity provider. Standard username/password login will no longer be available for SSO-enabled users.
Testing Your SSO Configuration
Before enabling SSO for all users, confirm the following:
- Login URL matches: The SSO launch URL configured in your identity provider is the exact Login URL shown on your FileInvite SSO/SAML settings page.
- ACS URL matches: Your IdP application is configured with the current ACS URL from your FileInvite SSO/SAML settings page.
- Launch from the IdP: Test by launching FileInvite from your identity provider's app tile or dashboard — not from a bookmark or FileInvite's own login page.
Then complete a full test run:
-
Log in to your identity provider
-
Click the FileInvite application tile
-
Confirm you're redirected into FileInvite already authenticated
-
Test logout: confirm single logout works correctly
-
Verify user attributes: check that user information (name, email) is correctly passed from your IdP
Because only IdP-initiated login is supported, testing must always begin from your identity provider — not from FileInvite.
Troubleshooting Common Issues
SSO login fails with "Authentication Error"
- Verify the Entity ID and URLs match exactly between FileInvite and your identity provider
- Check that your certificate is in the correct Base64 format
- Ensure the certificate hasn't expired
Users aren't redirected to the identity provider
- Confirm SSO is enabled in FileInvite
- Verify your identity provider application is active
- Check that the Start/Login URL is correctly configured in your IdP
Custom domain doesn't work with SSO
- Verify both DNS records (AWS Certificate Manager and CloudFront CNAME) are in place
- Allow up to 48 hours for DNS propagation
- Confirm DNS records point to the correct values provided by FileInvite
Users are logged out or see errors after closing and reopening FileInvite
-
Confirm the user is launching FileInvite from your identity provider's app tile each time, not from a browser bookmark or saved link
- If using Microsoft Azure AD, stale cookies from a previous session can cause login failures even when configuration is correct
- As a workaround: Always launch FileInvite from the IdP application tile rather than a bookmark. This avoids stale session cookies (particularly with Microsoft/Azure AD) that can otherwise cause repeated authentication errors.
Certificate errors when accessing the portal
- Check that the AWS Certificate Manager DNS record is active
- Verify SSL certificate has been issued (may take up to 30 minutes after DNS records are added)
- Clear browser cache and try again
Security Best Practices
💡 Best Practices:
- Use metadata file upload when possible: This reduces manual entry errors and speeds up configuration
- Test thoroughly before full rollout: Verify SSO works correctly with test accounts before enabling for all users
- Monitor certificate expiration: While AWS handles renewals automatically, periodically verify your DNS records remain in place
- Document your configuration: Keep records of your SSO settings and DNS entries for future reference
- Coordinate with your IT team: Ensure both FileInvite and identity provider administrators are involved in setup
- Plan for DNS propagation time: Allow up to 48 hours for DNS changes to fully propagate when setting up custom domains
- Always launch FileInvite from your IdP: Instruct users to sign in by clicking the FileInvite tile in their identity provider's dashboard, rather than using a bookmarked FileInvite link. This is required since only IdP-initiated login is supported, and it also prevents stale cookie issues (particularly with Microsoft/Azure AD).
Important Notes
Access FileInvite Through Your IdP, Not by URL: Since only IdP-initiated login is supported, users must always access FileInvite by launching it from within your identity provider (e.g. clicking the FileInvite tile in Okta, Azure AD, or Google Workspace) — not by navigating directly to a FileInvite URL, using a browser bookmark, or entering the FileInvite login page address. Accessing FileInvite directly by URL will not authenticate the user.
SSO Applies Organization-Wide: When SSO is enabled, it applies to all members within your organization. Individual users cannot opt out of SSO authentication.
Custom Domain Integration: SSO configuration and custom domain setup must be completed together in the current system architecture. You cannot configure these features separately.
DNS Record Maintenance: Keep your AWS Certificate Manager and CloudFront CNAME records active in your DNS settings. Removing these records will immediately cause an outage for SSO and custom domain access.
Regional URLs: The URLs shown in this article use the US region (us.fileinvite.app). If your organization is in the Australia region, your URLs will use au.fileinvite.app instead.
🎉 Success! Your organization's Single Sign-On is now configured. Team members can access FileInvite using your organization's identity provider credentials. 🎉
Need Help?
If you encounter issues during SSO configuration or need assistance with DNS setup, contact your FileInvite account manager or support team for guidance.