If your Fileinvite Login URL ends in fileinvite.com, please use this knowledge base instead.
Learn how to collect bank statements directly from borrowers through the Client Portal using the Illion BankStatements integration. Instead of manually uploading statements, borrowers are redirected to Illion's secure portal where they connect their bank and retrieve statements automatically.
How It Works
The Illion BankStatements integration adds a Bank Statements request type to your Invites. When a borrower opens a Bank Statements request in the Client Portal, they see a Retrieve Statement button that redirects them to Illion's secure portal. The borrower selects their bank, enters their credentials, and Illion retrieves the statements automatically and returns them to the Invite.
Retrieved bank statement files are automatically converted to PDF and treated identically to any other uploaded document — they are included in collate, Download All (ZIP), and cloud sync integrations (Google Drive, SharePoint, OneDrive for Business).
Prerequisites
Before using the Illion BankStatements integration, your account must meet the following requirements:
- The Bank Statements add-on is included in your account's plan
- Portal V3 is enabled on your account
- Your Illion account has been configured for real-time sync updates
If you're unsure whether your account meets these requirements, contact your FileInvite account manager.
Setting Up the Integration
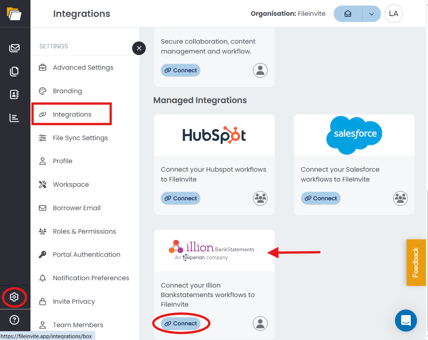
- Click the Settings icon (⚙️) in the bottom-left corner of the sidebar
- Select Integrations from the Settings menu
- Locate the Illion BankStatements integration
- Click Settings, then click the Setup tab or the Setup BankStatements Integration button
- Paste your iFrame URL provided by Illion when you created your BankStatements account
- Toggle the switch Next to Illion Bankstatements to enable
- Click Save
Adding an Illion Bank Statements Request to an Invite
- Open an existing Invite and click Invite Actions > Edit Invite, or create a new Invite
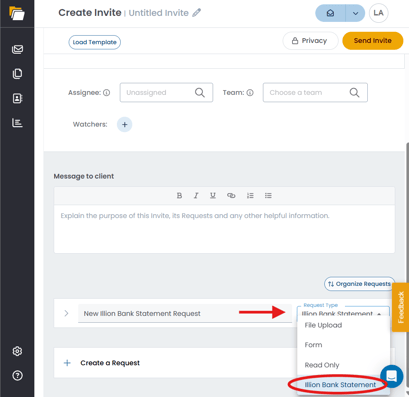
- In the Requests section, click + Create a Request
- Select Illion Bank Statements as the request type
- Enter a clear description with instructions for your borrower — for example: "Please retrieve your last 6 months of bank statements using the secure retrieval tool below. Click the Retrieve Statement button to get started, use the search function to find your bank, and enter your credentials to submit your statements."
- Click Save to add the request to the Invite
💡 Best Practice: Set up a Bank Statements request inside your Template to avoid configuring this for every new Invite.
Borrower Experience
When a borrower opens a Bank Statements request in the Client Portal, the process differs from a standard file upload.
File Handling
Bank statement files retrieved through Illion are handled the same way as any other document in FileInvite:
- PDF conversion — Files are automatically converted to PDF
- Download Files — Included when downloading all files as a ZIP
- Collate — Included in document collation
- Cloud sync — Synced to connected cloud storage integrations (Google Drive, SharePoint, OneDrive for Business)
Important Notes
- The Illion BankStatements integration is available to Australian accounts only
- The Bank Statements add-on must be active on your plan — it is not included by default
- Portal V3 must be enabled on your account for the borrower experience to function correctly. See Client Portal for details.
- Each FileInvite user has their own integration settings — if you are not the owner of an Invite, your BankStatements configuration will not apply to that Invite
- FileInvite acts as a gateway to Illion's portal. For issues related to bank access, missing data, or the BankStatements portal itself, contact Illion directly:
- BankStatements Contact Page
- Phone: 13 23 33 / +61 3 9828 3443 (Press 2, then 3 when prompted) — 7am to 7pm Monday to Friday AEST
🎉 Bank statements collected automatically — no more manual uploads from borrowers! 🎉