If you're having trouble with LiveForms, be sure to check out our LiveForm Troubleshooting Guide for step-by-step solutions and helpful tips.
Important: Ensure the PDF you are uploading does not already contain fillable fields (e.g., created in Adobe Acrobat or another PDF editor), as this may result in an error. Please use a flat, non-fillable version of the PDF. You can flatten it by printing the file to PDF. If you'd like to keep the file as is, set the request type to Regular instead. Guide: How to Prepare a File for a Live Form
Either - within your Templates or when Creating an Invite - you can upload a document and setup a variety of fields to make gathering information from your clients really easy.
For your clients, it becomes super simple to complete this information from the Client Portal, and they can save their progress as they go, to come back and complete later.


In this guide:
Setup a Live Form
-
Load a Document
-
The Different Fields & Options
-
Setting up the Fields
Your Client's Experience

-
In the FileInvite app, click Create New Invite OR go to Templates and Create a new Template - or open an Existing one

Learn how to create and send an invite
Note: When creating a Live Form - in a Template - any Personal Fields can only be set for a single Contact. When loading the Template into an Invite you can setup any Additional Persons Personal Fields
2. Create a request and upload the document you want to use as your Live Form
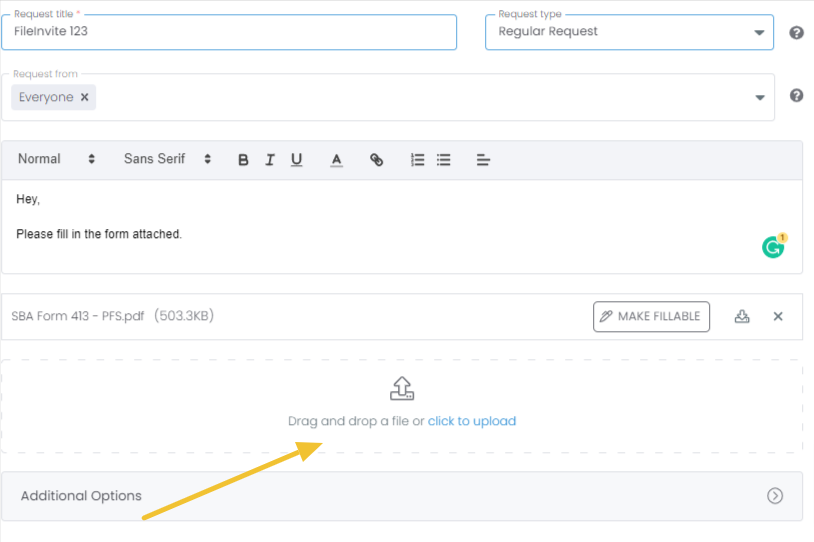
3. Once the document is uploaded click the Make fillable/signature form button next to the Download button.

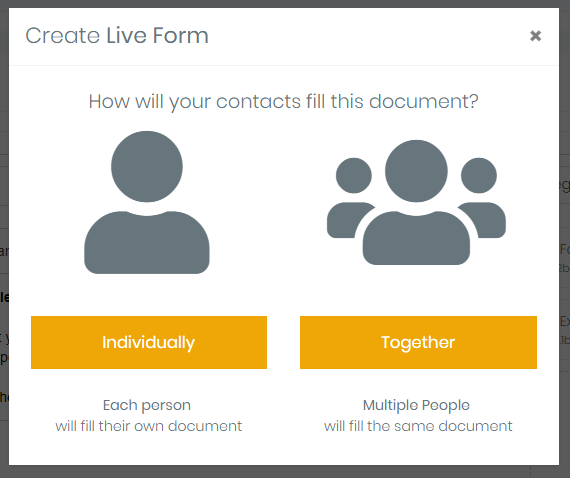
3a. If Creating an Invite
-
Use Individually - to setup the form so that each Person will complete their OWN Copy (Essentially duplicating the form for each Person)
- Use Together - to have Multiple People WORK TOGETHER to Complete a Single Document.
- When creating a Live From from an Invite. you need to add 2 or more contacts to an invite for the Together option to be available.
- When creating a Live Form from a Template, the Together option is not available.
Note: If you have any issues with position of content try converting the file to a PDF before uploading, this can usually be done by using the Save As... functionality of most Document Editors
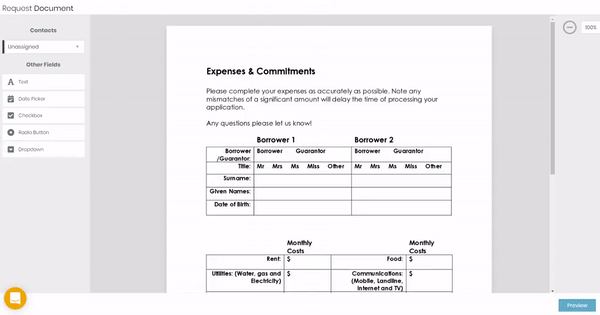
4. Add and place your fields onto your Document as desired.
Simply Drag them to the right spot, Resize as necessary (using the bottom right corner of the field) and Customise the Options of each Field as Desired.
Use the Preview button to see how these elements look! Remember to Turn Off Preview to start moving fields again.
⚠️IMPORTANT⚠️
- All contacts assigned to the LiveForm must complete their sections before the form becomes available for download
- Removing a contact from the Invite does not remove their LiveForm assignment - they must still complete their assigned fields
- Once any contact completes their section, the LiveForm locks for editing - no changes can be made to the form structure or field assignments
- The form will remain locked until all originally assigned contacts sign their sections - partial downloads are not available
See below for a break down of the different Fields, their Uses, as well as their Options

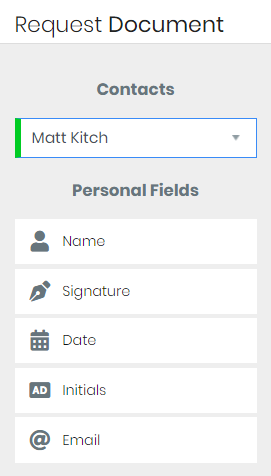
4a. Personal Fields
Personal Fields can be setup on both the Template and when Creating an Invite
Note: When creating a Live Form - in a Template - any Personal Fields can only be set for a single Contact, when loading the Template into an Invite you can setup any Additional Persons Personal Fields
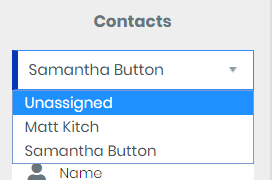
When Creating the Invite simply change the Contact from the Dropdown Box to choose whom you will place fields for.
-
Name - Contacts Name on the Invite
-
Signature - Drawn on by the Contact Assigned via the Client Portal
-
Date - Automatically assigned as the Date of Completion
-
Initials - Contacts Initials
-
Email - Contacts Email Address
Note: You can change the Contacts details by going to the Contacts page and finding the relevant Contact. if you change this before the Contact signs or completes the form it will update their information.

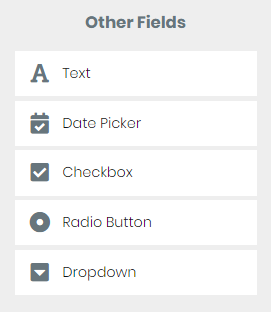
4b. Other Fields
These are Assignable Free Form Fields that can be entered with any information from your clients, in some situations it might make more sense to use Other Fields than a Personal Field as the Client can enter the information and either person can complete these.
Note: Change the Contact to ensure fields are assigned to the correct contact. For ANYONE to complete a field it must be Unassigned
-
Text - Text, Number, Email or Multi Lines - A Text Field is useful for gathering all types of information that your client needs to Type in

-
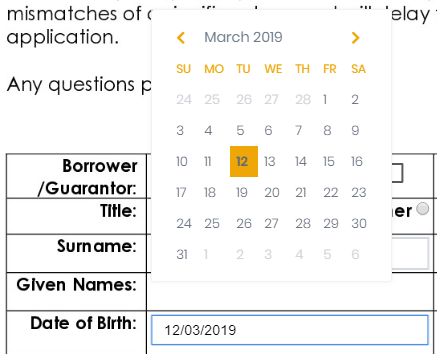
Date Picker - Clients can either type or select their date from a Calendar
-
Checkbox - Clients can select these - best suited when multiple choices can be selected

-
Radio Button - Setup Groups of these and your Clients can choose a single option of the Group

Note: When setting up Radio Buttons use the Blue Addition Circle to add another Button, and simply move each button individually into the right spot.
-
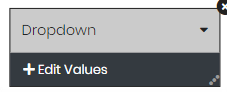
Dropdown - Setup a Finite list of Options for your Client to choose from

Note: When setting up Dropdowns use the Edit Values Text Area to load your different values

4c. Field Options
As you add and remove Form Fields you'll see options appear on the right hand side. These do vary depending on the field but the options available are:
-
Assigned Contact - Change the Contact Assigned to the Field
-
Field Label - What you'd like to call the field & what is seen inside the field when the Client Works on it.
-
Type - As explained in the Text section of 4b.
-
Required - The Client cannot complete the form if these are entered.
-
Read Only - Fields that have no action available
-
Font - Adjust the Font Size and the Font Colour & Style
-
Checked - Whether a Checkbox is checked by default
-
Options - Different Choices/Values available for certain Fields

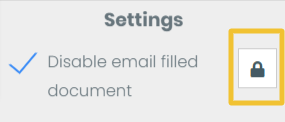
5. If you want your Client to not receive a signed copy of the Form via email, make sure that you check "Disabled email filled document" on the right side of the Live Form editor. Otherwise, skip to step 6.
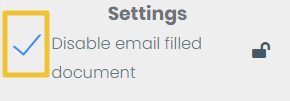
If you're creating a Template, you have the option to lock this Setting to prevent Users from modifying it.
6. Press the Save button to Save the Form
7. Press Save or Create Request to Save your Request
8. Finalise your Invite or Template and Send it off or Save it for Later!

Your Clients Experience
1. They'll select the Request and see a Click to Fill Form button

2. They'll then be able to fill in their information as required, including Signing, Filling and Selecting relevant fields! All within the Client portal!

Note: When working on a Live Form the Client can click the Save Draft button to save their progress so far and come back later
3. They can Submit and Complete
Step 4. There isn't one! No more pain of your Clients downloading, completing, renaming, saving and then reuploading!
Auto-Apply Saved Signatures
When a borrower has previously saved their signature in FileInvite, it's automatically applied when they click a signature field in any LiveForm.
How it works:
- The borrower clicks on a signature field
- If they have a previously saved signature, it's automatically inserted
- The borrower can accept the auto-applied signature or create a new one by clicking on the field
Note: Borrowers save their signature by completing a signature field and checking the option to save it for future use. Once saved, the signature is available for auto-application on all future LiveForms.

🥳 Congrats! You've just sent off your First Live Form, and your Clients will love you for it! 🥳