If your Fileinvite Login URL ends in fileinvite.com, please use this knowledge base instead.
1. Sign-up
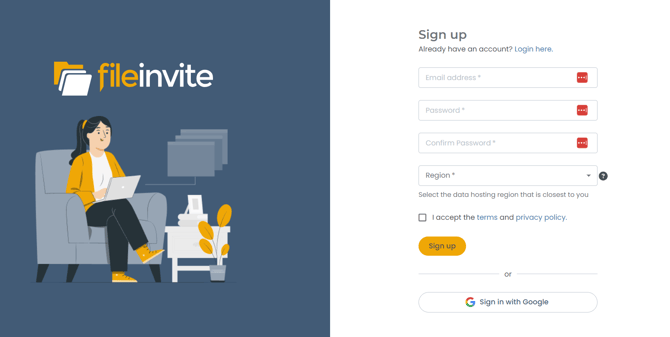
The Sign-Up feature enables new users to create an account with File Invite, granting them access to its functionalities. This process is designed to be quick and secure, ensuring user data protection from the outset.
- User Instructions
- Access the Sign-up page
- A user can also visit the sign-up page via the login page and click the ‘Sign up here’ link just below the email address box.
- Fill in the required fields
- Password (and confirm password)
- Region (Selecting the data hosting region where our users want to store their data)
- Agreeing to the terms and privacy policy
- Click the Sign up button to complete the sign-up process
- Users will then proceed to the pre-qualification window to finish the onboarding process. Then they can start using File Invite.
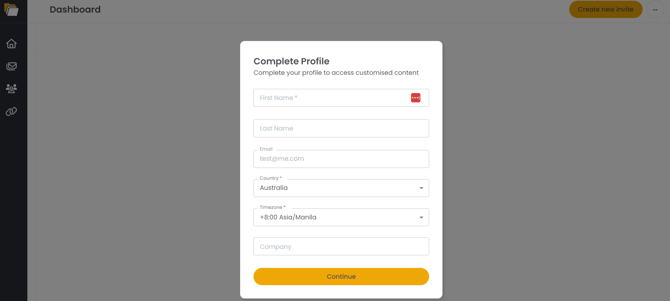
2. Pre-qualification
This feature was designed to collect essential information from users, such as their first name, last name, email, timezone, and company name enabling a personalized user experience. For the business, it helps us gather demographic data to better understand our customer base.
- User Instructions
- After successfully signing up, users are automatically redirected to the pre-qualification page to complete the onboarding process.
- Once the pre-qualification window is completed and submitted, users will gain full access to the application features. An incomplete pre-qualification window results in restricted access in File Invite.
3. Login
This feature enables registered users to access File Invite.
- User Instructions
- Navigate to https://fileinvite.app/login, input the user’s account email and click the Next button.
- A password field will appear for users to enter their password.
- A show password option has been made available

4. Dashboard
When you sign into your FileInvite account, you land in your Invites Overview Page, which provides an at-a-glance view of your Invites.

- The navigation panel along the left displays the main menu icons like invites, templates, contacts, etc. To expand any menu option, click its icon.

-
 At the top right of any FileInvite page is the Create Invite button and your profile icon. Click the dropdown arrow next to Create Invite to access additional options:
- Create Bulk Invites
- Create Recurring Invite
Clicking the profile icon opens a menu to change user settings or log out. You can change your account password and turn on/off two-factor authentication under user settings.
Notification Preferences
Users can now manage their email notifications directly from within FileInvite to reduce inbox clutter and ensure they only receive relevant updates.
-
Master Toggle: Pause or resume all notifications with a single switch
-
Individual Controls: Turn specific notifications on or off, including:
-
Invite sent
-
Invite in progress
-
Client submitted documents
-
Invite due
-
Ready for review
-
New portal message from borrower
-
Location in App: Go to Settings > Notification Preferences to customize your notification preferences.

-
The Invites menu lets you toggle between:
- Manage Invites
- Recurring Invites
- Draft Invites
- Archived Invites
- Collation History
Click the Invites icon to access these options.
- Click on any invite to view more details. Invite messages are located to the right. The messages will be collapsed by default, you can click the "view messages" to expand the messages menu.


- The Integrations menu lets you connect your account to your cloud drives, to download the files automatically as they are received. You can look up individual articles for more information on integrating specific cloud drives and accounts. Australian accounts with the Bank Statements add-on can also configure the Illion BankStatements integration from this menu to collect bank statements directly from borrowers through the Client Portal.

Account Usage Metrics
FileInvite now tracks key usage metrics at the account level to support better visibility and future plan management. Tracked metrics include:
-
Number of returned requests
-
Storage usage
-
API calls
-
Total user count
These metrics are visible at the account level and help teams monitor their FileInvite usage for operational awareness and scalability.
Enhanced Reporting Dashboard
Team Pipeline Status Charts:
- Visual overview of invite progress by team
- Track completion rates across departments
- Identify bottlenecks in your workflow
Invite Distribution by Team:
- See which teams are handling the most invites
- Balance workload across departments
- Monitor team performance metrics
Template Usage & Effectiveness:
- Track which templates are used most frequently
- Monitor completion rates by template type
- Optimize your template library based on usage data
Form Collaboration Features
Real-Time Form Collaboration: When multiple contacts work on shared forms:
- Each contact can see what others have completed
- Reduces confusion and prevents accidental overwrites
- Progress updates appear in real-time
- Signatures and field completions are visible to all authorized users
Security Enhancements
- Signature Clearing: When a signed form is rejected, all signatures are automatically cleared while preserving other form data
- Session-Based Downloads: Borrowers can only download/delete uploaded files until they refresh their browser page
- 30-Minute Window: Download restrictions work alongside the existing 30-minute access window
Print Functionality
Generate professional PDF summaries of invites:
- Include all contact information, requests, descriptions, and due dates
- Available in branded and non-branded versions
- Perfect for sharing with external partners or third-party lenders
- Accessible from any invite view
Get Started Today
🎉 You're all set to explore FileInvite! Head to your Dashboard to create your first Invite. 🎉