Creating and Sending an Invite
In this article, we’ll walk you through the process of sending and tracking an Invite, including:
If your Fileinvite Login URL ends in fileinvite.com, please use this knowledge base instead.
Step 1: Configure the Invite and Contacts
Setup Invite Content

-
Enter the Subject Line, which is shown in the recipient's email (and currently serves as the Invite name)
-
Set the Due Date — must be at least one day after the invite is sent
-
Write a message to provide context or instructions to the recipient
-
Hyperlinks: You can include clickable links in your invite and request messages:
- Highlight the text you want to turn into a link
- Click the hyperlink icon in the message editor
- Enter the HTTPS URL (only secure links are allowed)
- The system validates links using Google's Safe Browsing API for security
- Links will open in new tabs for borrowers
-
-
Add an Invite Name. This field allows you to create an internal identifier for your invite that's separate from what borrowers see. This helps you distinguish between multiple invites when managing several loans or projects.
-
- The Invite Name automatically populates with the template name when you select a template
- You can override the auto-populated name with your own custom identifier
- This name is only visible to internal users and does not appear in borrower communications
- Use descriptive names like "Smith Loan - Purchase" or "ABC Company - Equipment Financing"
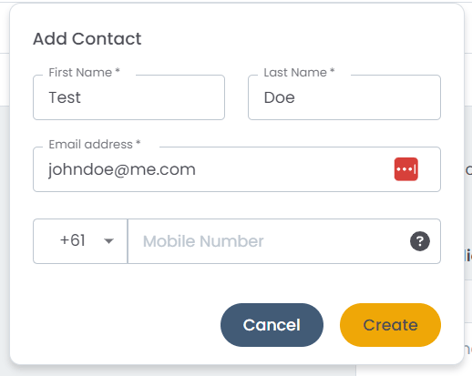
5. Go to the Send To section and click Add New, or search from your saved contacts
6. In the Add Contact window, enter:
-
First Name
-
Last Name
-
Email
-
Optional: Mobile number (no spaces/dashes) to enable SMS notifications

7. Click Create to add the contact to the invite
Tip: Use Add all Contacts from Company to quickly select all recipients from a specific company—ideal for organizational invites.
Adding Team Members and Watchers
You can assign Assignees, Teams, and Watchers directly during invite creation:
- In the Create Invite header, you'll see new fields for:
- Assignee: Select the team member responsible for this invite
- Team: Choose which team should have access to this invite
- Watchers: Add team members who should receive notifications
- Removing Watchers: Once watchers are added, you can remove them by clicking the "X" next to their name in the watchers list.
Step 2: Configure Document Requests
Once contacts are added, scroll to the Requests section:
-
Add new requests or edit existing ones
-
Choose Document Upload or Fillable Form
-
Use Add Attachment or Drag and Drop files into each request
-
A default request name is provided—customize it as needed

✅ Autosave is enabled—any changes are saved in real time, and you'll see confirmation messages that your progress is stored as a draft.
Grouping Document Requests
You can now organize document requests into logical groups:
-
Click Organize Requests
-
Create and name groups
-
Drag and drop requests into each group
-
Reorder groups to control visibility priority
-
Multi-select and ungroup as needed
This is especially useful for commercial and multi-entity borrowers.
Duplicate Group Functionality:
- After creating your first request group, you can duplicate it using the Duplicate Group button
- The duplicated group will be named "[Original Name] Copy"
- Modify the duplicated group as needed for similar document requirements
Step 3: Set Notification Preferences
At the top of the page, click the Notification Bell to configure reminder settings:
-
Almost Due reminders: Never, 1–7 days before due
-
Overdue reminders: Customize how soon and how often recipients are notified

Step 4: Send the Invite
After configuring all sections:
-
Review the details
-
Click Send Invite at the top

Once sent:
-
A success message appears with an option to View Invite
-
You can also Save the request set as a template for future use

View and Manage Invites
Click View Invite to open the Invite Overview Page, where you can:
-
Track recipient activity
-
Monitor document submissions
-
Resend reminders
-
Archive or duplicate invites

Print Invite
Generate a PDF summary of your invite to share with external partners who cannot access FileInvite directly:
- Open your invite
- Click the Print button
- The PDF will include:
- Contact names
- All requests and descriptions
- Due dates
- Branding (if enabled on your account)
Mark as Complete
You can manually mark invites as complete without requiring all requests to be accepted:
- Navigate to your invite
- Click Mark as Complete
- The invite status changes to Complete
- If any changes are made to requests later, the status automatically reverts
Supported File Types and Sizes
For Invite Creation (App Users)
File Requests:
-
Max: 10 documents
-
Max size: 100MB per file
-
Supported types:
.pdf,.csv,.doc,.docx,.xls,.xlsx,.ppt,.pptx,.txt,.jpg/.jpeg,.heic,.heif,.png
Form Requests:
-
Only PDFs supported
-
Max size: 100MB
For Portal Uploads (End Users)
Same limits and file types apply.
Note:.heic and .heif files must be uploaded from macOS or iOS. Windows users should convert these files (e.g., to .jpg or .png) before uploading.
🆕 Additional UI & Functional Improvements
-
✅ Submit Button Logic: Now hidden until at least one file is uploaded—prevents incomplete submissions
-
📱 Portal Link Notifications: Trigger both email and SMS when sending portal access
-
📤 Empty Upload Requests: Now supported for workflows that require placeholder requests
