Want to connect FileInvite with an app outside of the currently supported integrations? We recommend using Zapier, a simple service for making your own custom app connections.
Note: Integration with Zapier is available on the Pro and Team plans. Find out more about the different FileInvite plans.

In this guide:
-
Activate the Zapier Integration
-
Add FileInvite to your Zapier account
- Adding Zapier if you Login under app.fileinvite.com
- Adding Zapier if you log in under us.fileinvite .com, au.fileinvite.com or uk.fileinvite.com
-
Create 'Zaps'

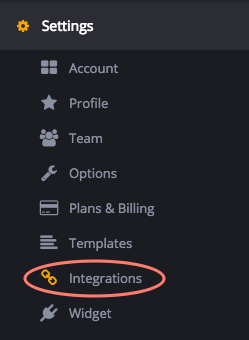
1. In the FileInvite app, go to Settings > Integrations
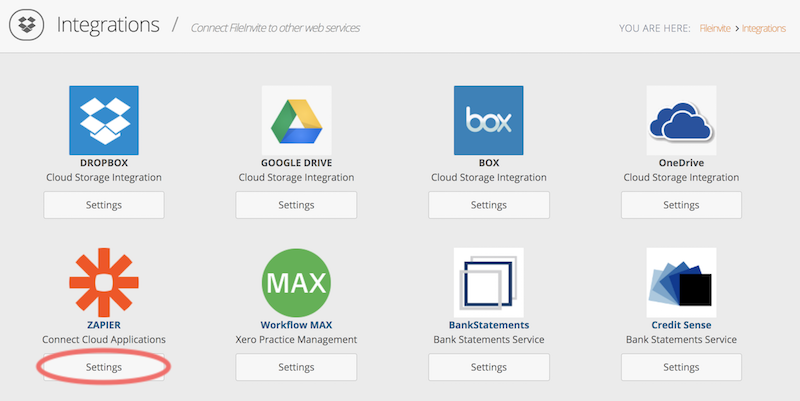
2. Under the Zapier integration, click Settings
3. On the Zapier Integration page, under Authentication Settings, click the Generate a password link
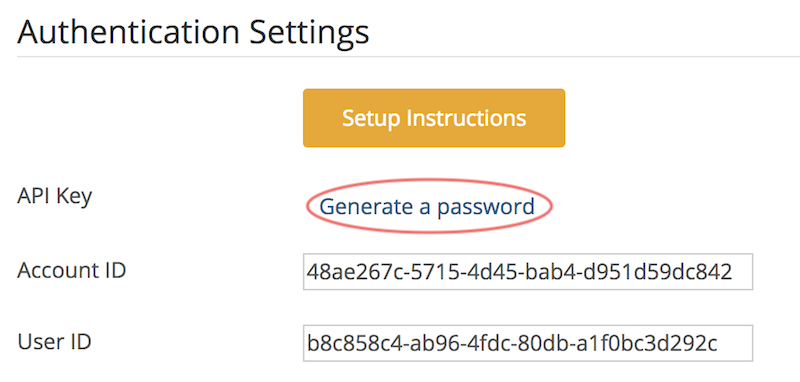
Keep this information handy as it will identify your unique FileInvite account in Zapier:
-
API Key
-
Account ID
-
User ID

Add FileInvite to your Zapier account
- Adding Zapier if you Login under app.fileinvite.com
- Adding Zapier if you log in under us.fileinvite.com, au.fileinvite.com or uk.fileinvite.com
️These steps will require you to sign in to your Zapier account.
If you don't already have an account, you can create one here.
Adding Zapier if you Login under app.fileinvite.com
1. In the Zapier Home Page, go to My Apps and click on Connect a new account.
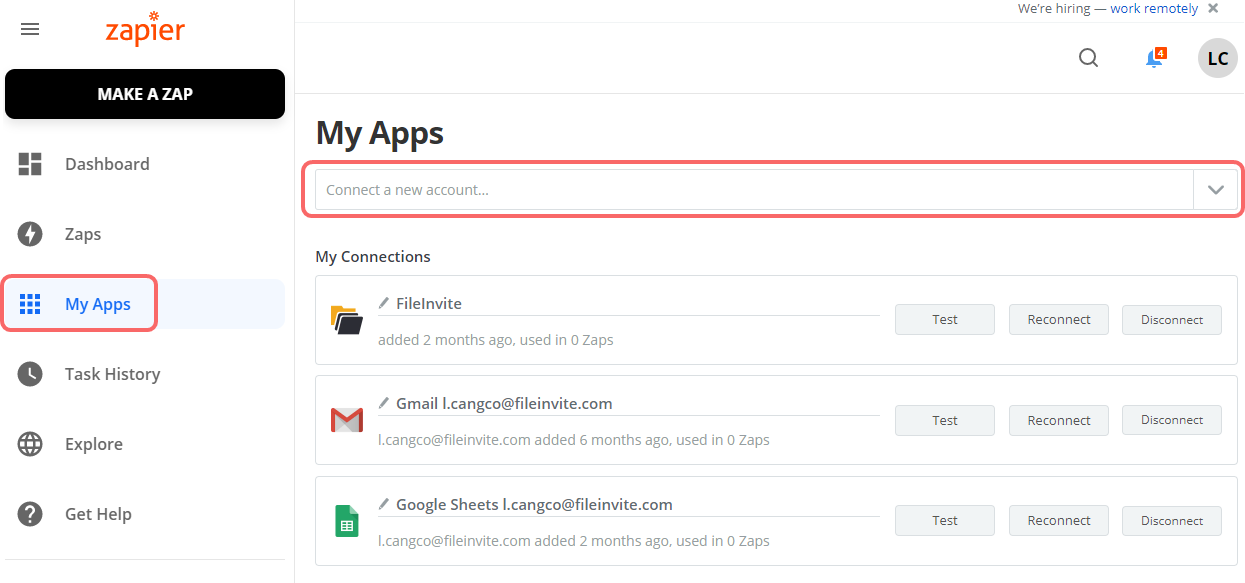
2. Under Connected Accounts, search for FileInvite and select it from the dropdown menu

3. In the window that opens, enter your unique API Key, Account ID and User ID from the previous steps
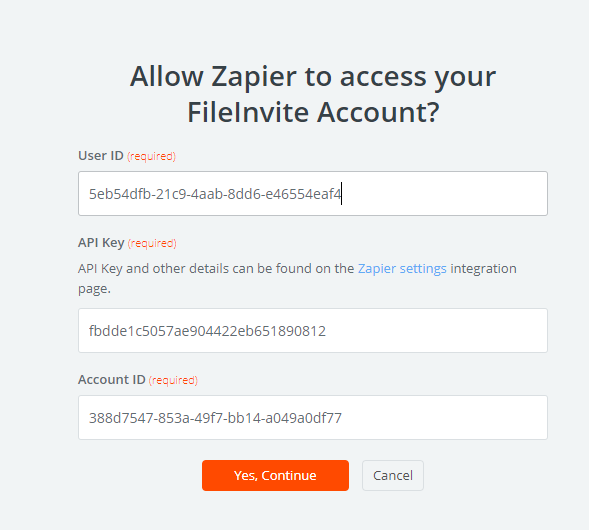
Click Yes, Continue
4. Your FileInvite account is now connected!
Click Test to verify the connection is successful.


Adding Zapier if you log in under us.fileinvite.com, au.fileinvite.com or uk.fileinvite.com
When you log in to FileInvite via us.fileinvite.com, au.fileinvite.com, or uk.fileinvite.com our Zapier account behaves a little bit differently. This requires using a different invite-only version of our Zapier application.
The below instructions show you what to do to get FileInvite working in this case.
-
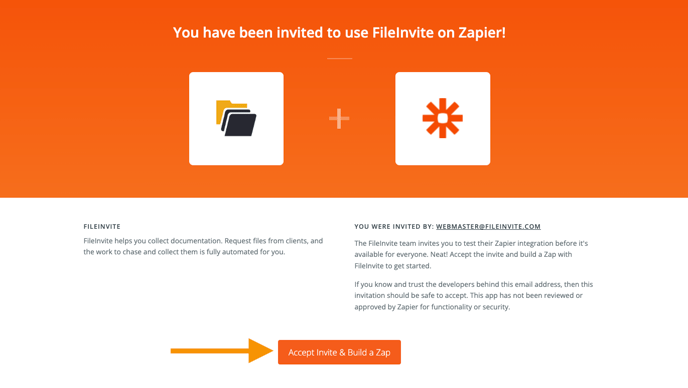
Follow the FileInvite zapier application link https://zapier.com/developer/public-invite/88181/83a2ab4c5c478f73bfec657da6391a14/
2. Click Accept Invite & Build a Zap
3. Now create your new Zap, when adding Fileinvite to a step do not click the Fileinvite app in the add app window, instead type Fileinvite in the apps search box so you can see the invite-only app versions:

Fileinvite 1.7.5 will show with an arrow next to it so you can expand and see all the available app versions:
- If you login under us.fileinvite.com, you choose FileInvite (1.7.1) as the app
- If you login under uk.fileinvite.com, you choose FileInvite (1.7.3) as the app
- If you login under au.fileinvite.com, you choose FileInvite (1.7.5) as the app

4. You may be prompted to connect your integration again, complete this connection using your settings under Settings > Integrations > Zapier.
Zapier is a simple service for making your own custom app connections.
Connecting the integration account
Here’s a step-by-step guide on setting up Zapier integrations:
-
Login to FileInvite and click on Settings under Zapier in Settings > Integrations
-
Click on Generate a Password and take note of the 3 sets of credentials API Key, Account ID, User ID. Take care to keep these private.
-
Log into your Zapier account
-
Head to zapier.com and find the zap you’d like to create
-
Under your Zapier settings go to Connected Accounts
-
Search for FileInvite. It should now appear in the list of apps
-
Click on FileInvite in the search results. A new window should appear to give FileInvite access to your Zapier account
-
Paste the 3 sets of credentials from the steps above into these 3 fields and click Yes, Continue. Take care to match up the right fields.
-
Your FileInvite account is now connected. Click on Test in the next step then create a contact in your FileInvite account to verify the connection
Create 'Zaps'
A Zap is a connection between FileInvite and another app. When a trigger event happens in one app, Zapier will automatically make the action event happen in the other app.
For example:
When a contact is created in your Xero account, they are automatically added to your FileInvite Contacts.

🎉Enjoy the power of linking to major apps with a Zap 🎉