Fortiro Protect ensures your client documents are real, and not fraudulent. It uses advanced digital, visual, and content analysis methods and document blacklisting.
Note: Integration with Fortiro Protect is exclusively available on our Enterprise Plans and requires a Fortiro Protect account. Please click here to book a consulting session with our sales team for this integration. Learn more about Fortiro Protect: https://www.fortiro.com/features
Supported Documents:
-
NOAs
-
Payslips
-
Web Transactions
-
Transaction Lists
-
Bank Statements
-
Card Statements

In this guide:
-
Activate the Fortiro Protect Integration
-
Enabling Fortiro Protect on your Templates/Invites
-
Scanning Documents for Fraud

Activate the Fortiro Protect Integration
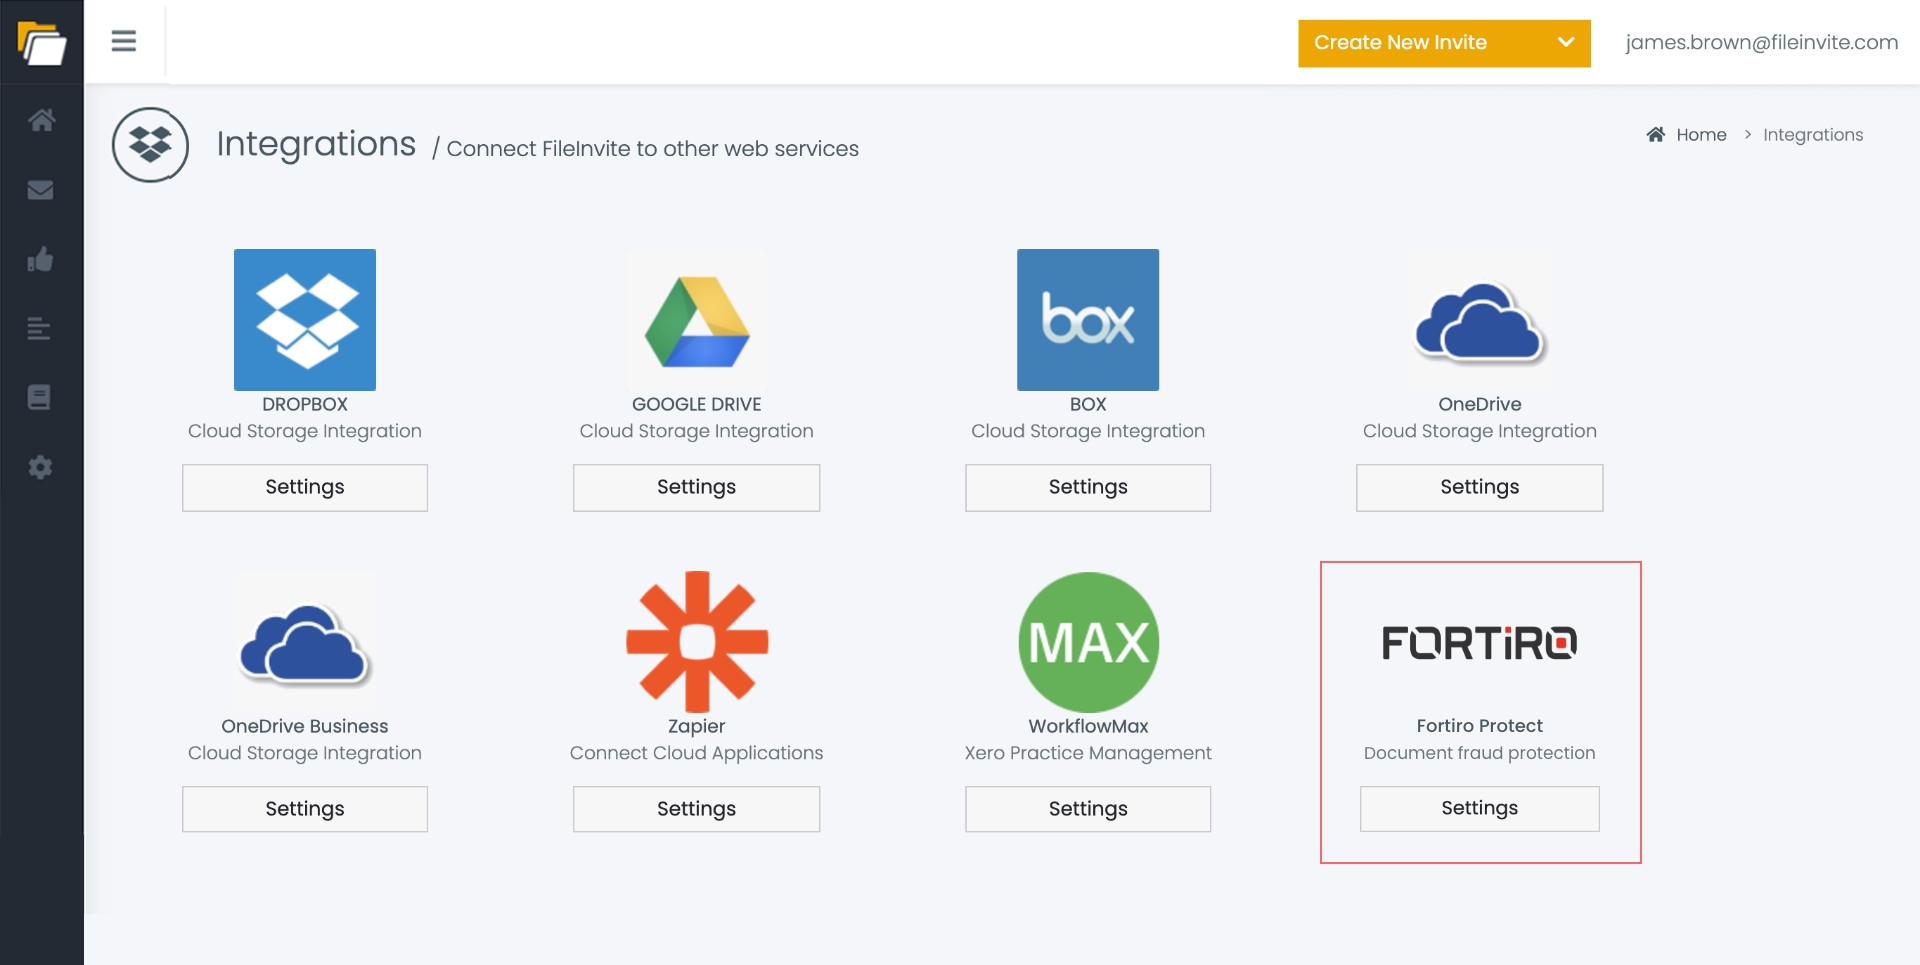
1. In the FileInvite, go to Settings > Integrations and click Settings under Fortiro Protect.
Note: You MUST be logged in as the Master user to see this page.
2. Enter your API Key (Provided by the Fortiro Protect Team) and then click Save.
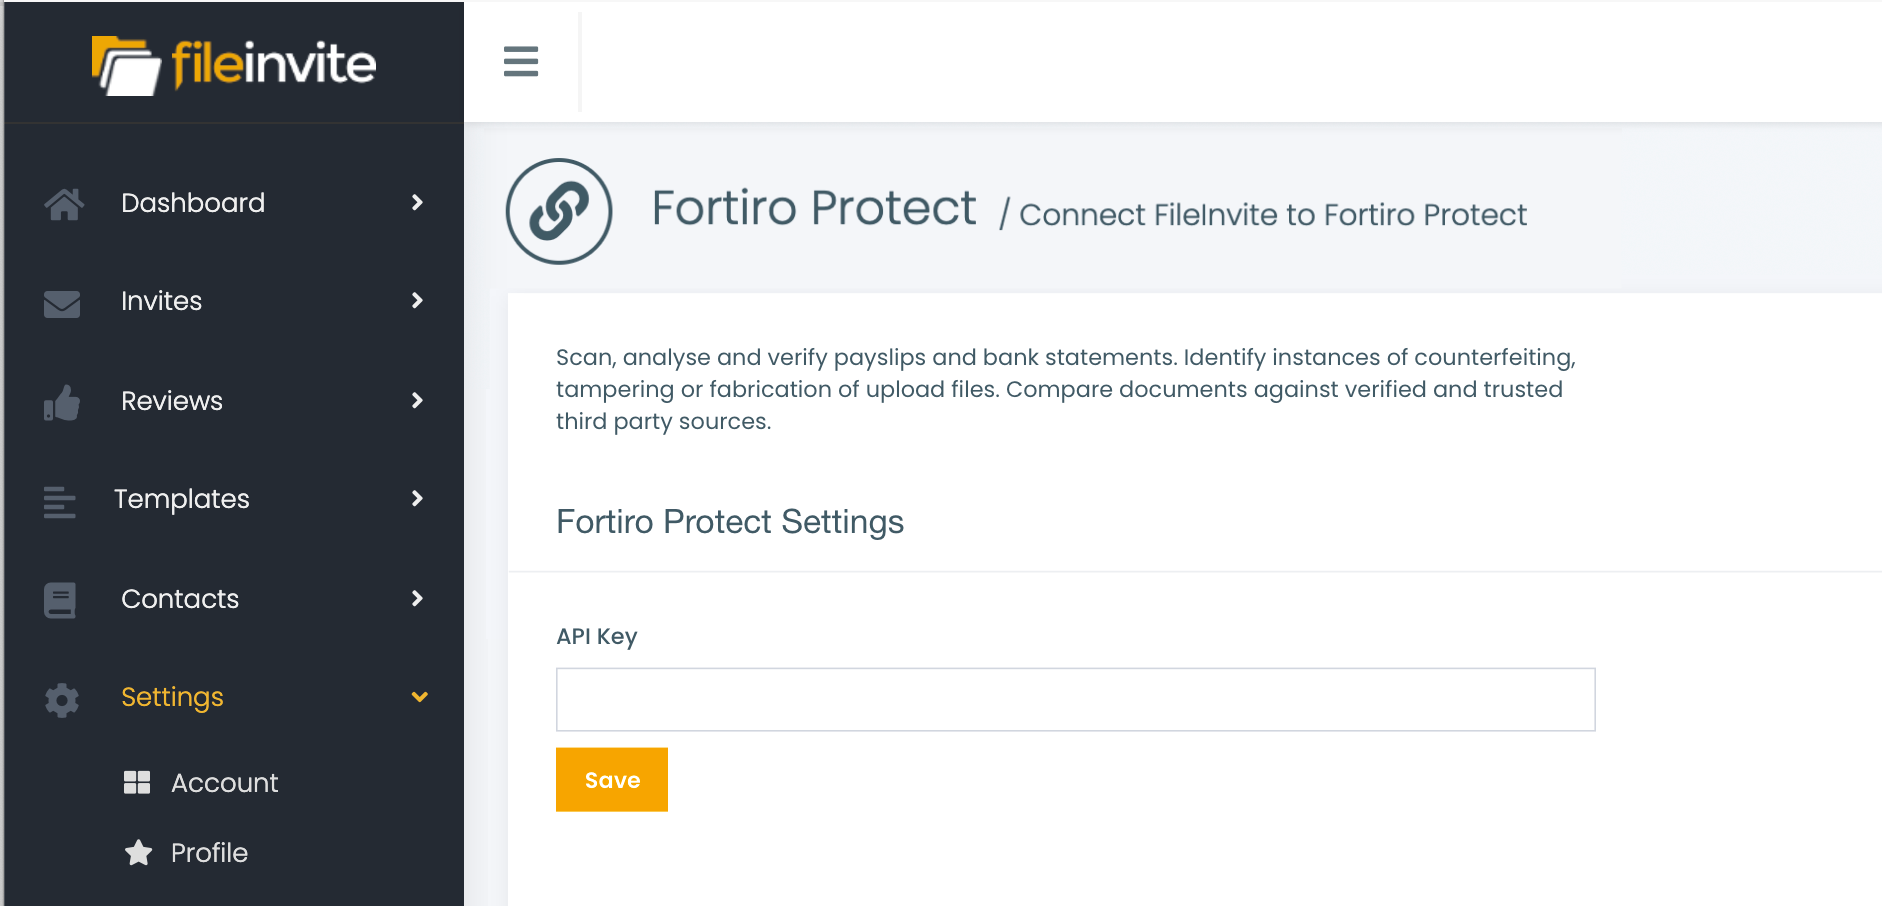
3. You'll see a successful connection message, which confirms your integration is now enabled.


Enabling Fortiro Protect on your Templates/Invites
Fortiro scans documents that are uploaded to specific requests on your Invite. So you'll need to enable Fraud Scanning on the requests that you expect the supported files to be uploaded to.
To enable on Template Requests
-
Open the Template that you'd like to enable Fraud Scanning on.
-
Click EDIT beside each request that you expect to receive supported files on (I.e. NOAs, payslips etc).
-
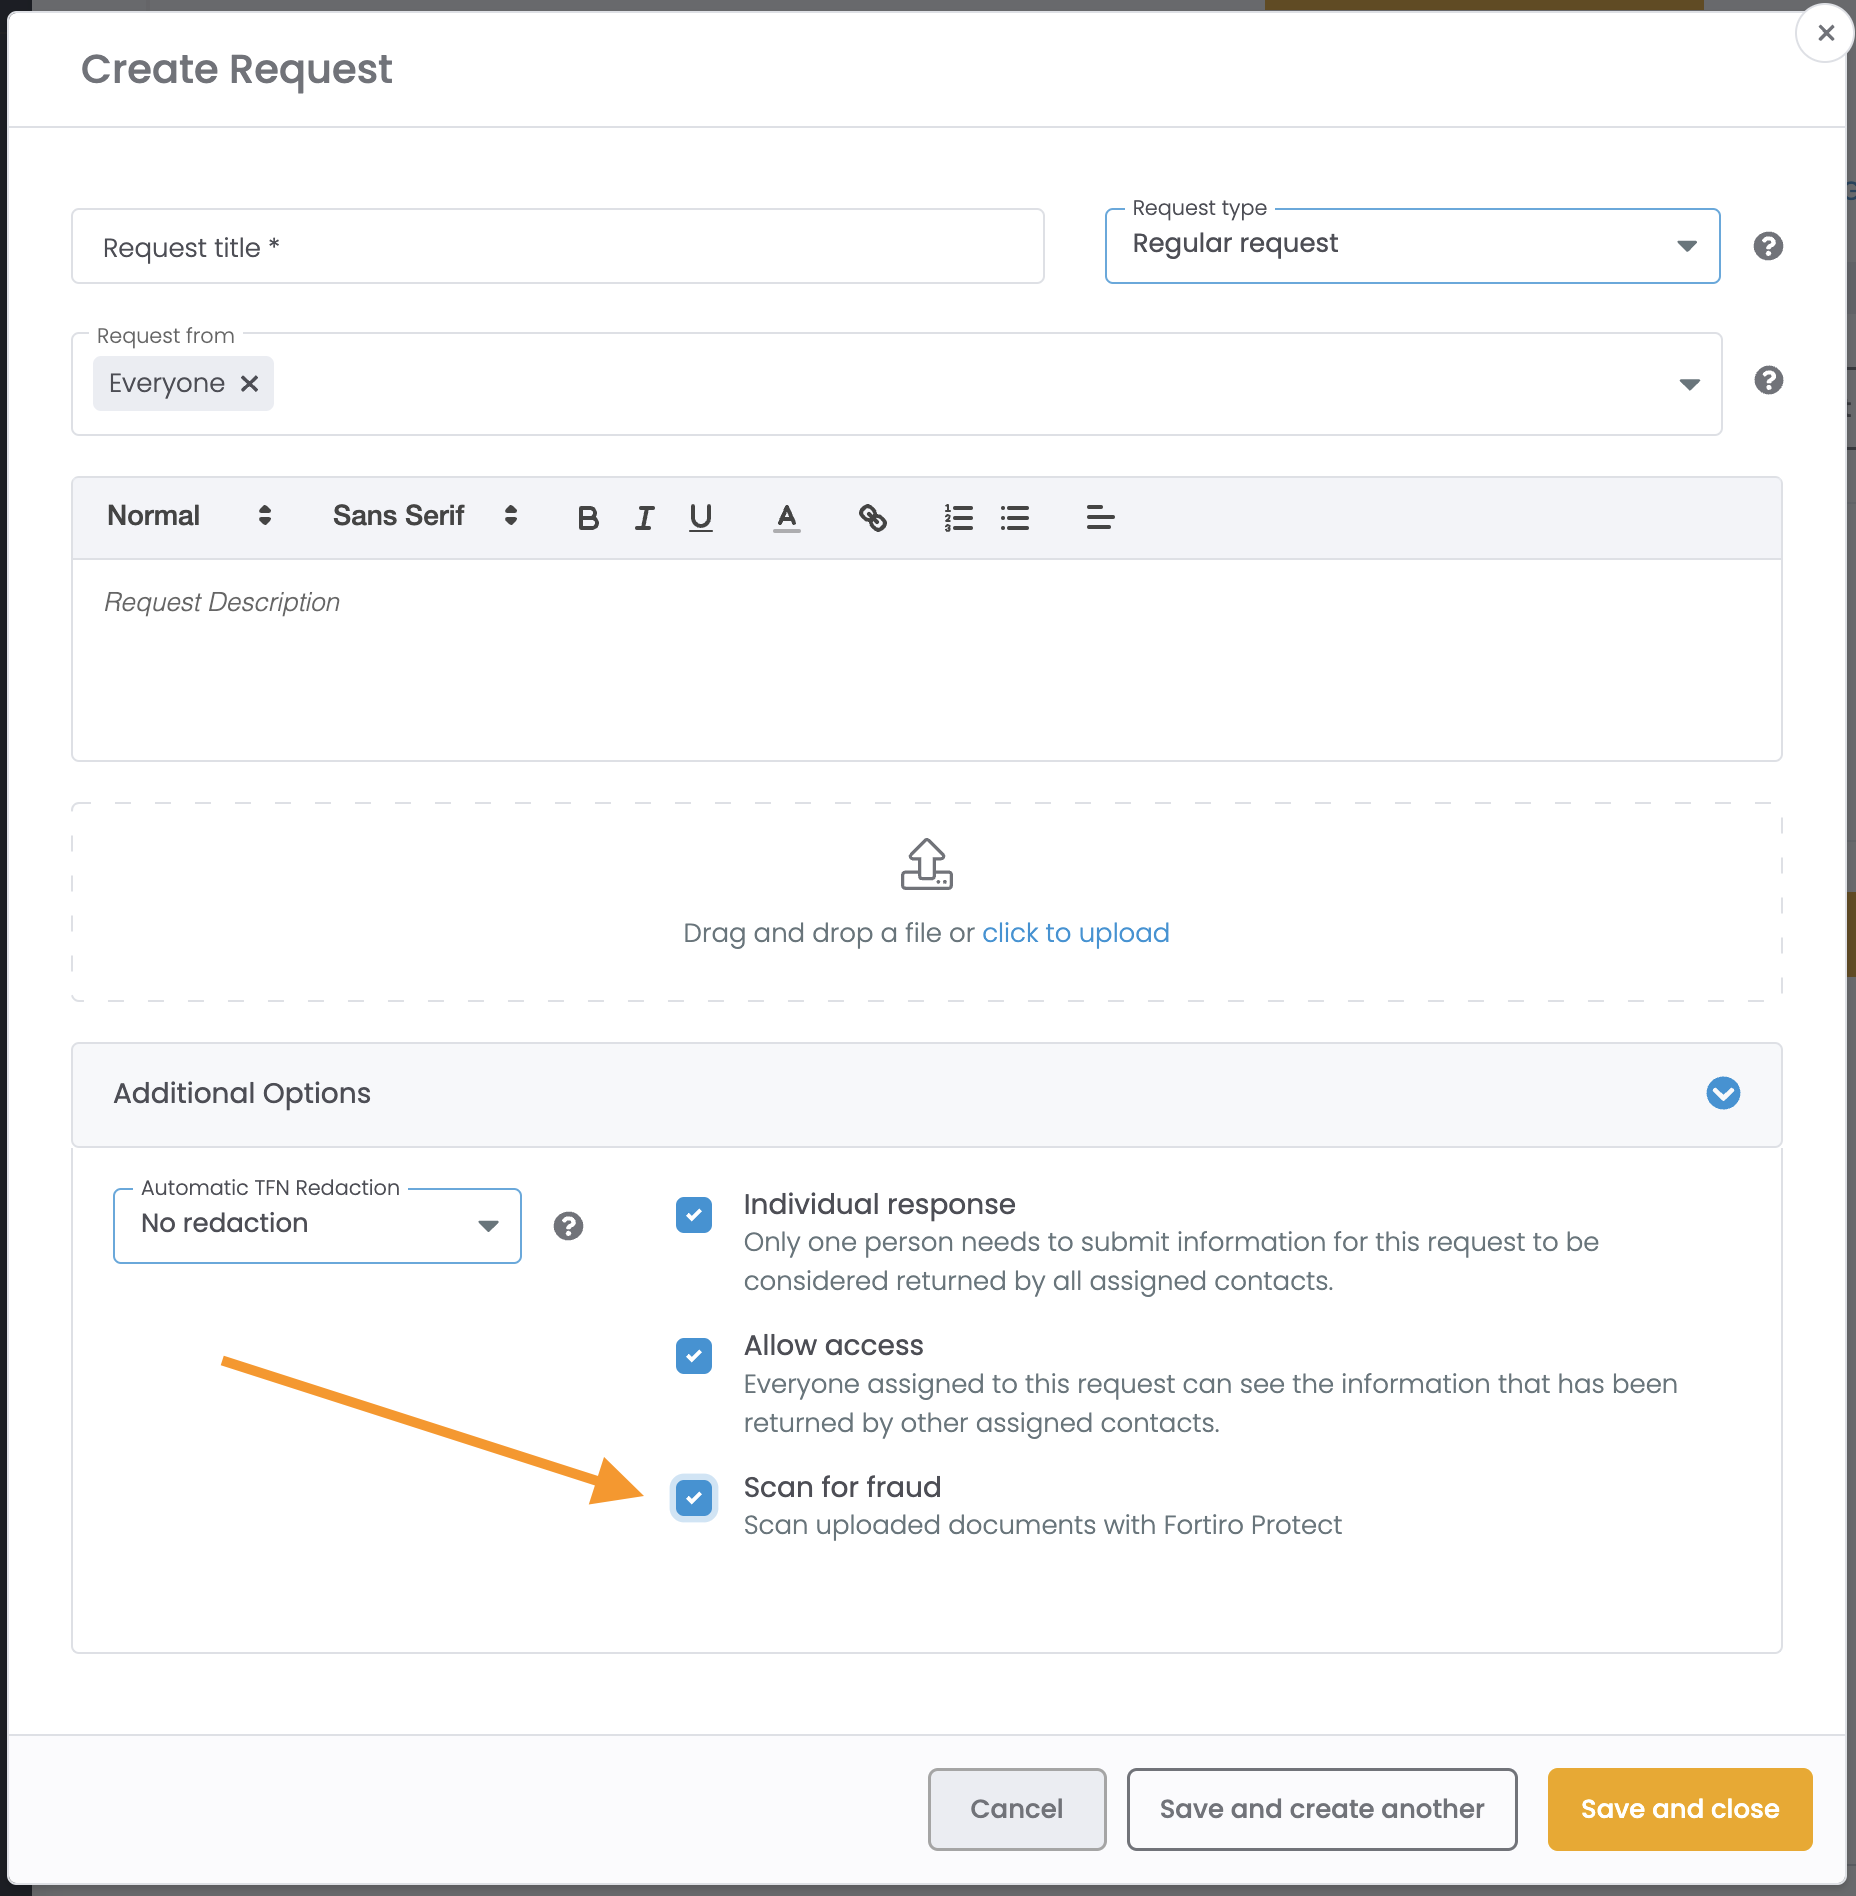
Expand the Additional Options and then Enable the Scan for Fraud option.
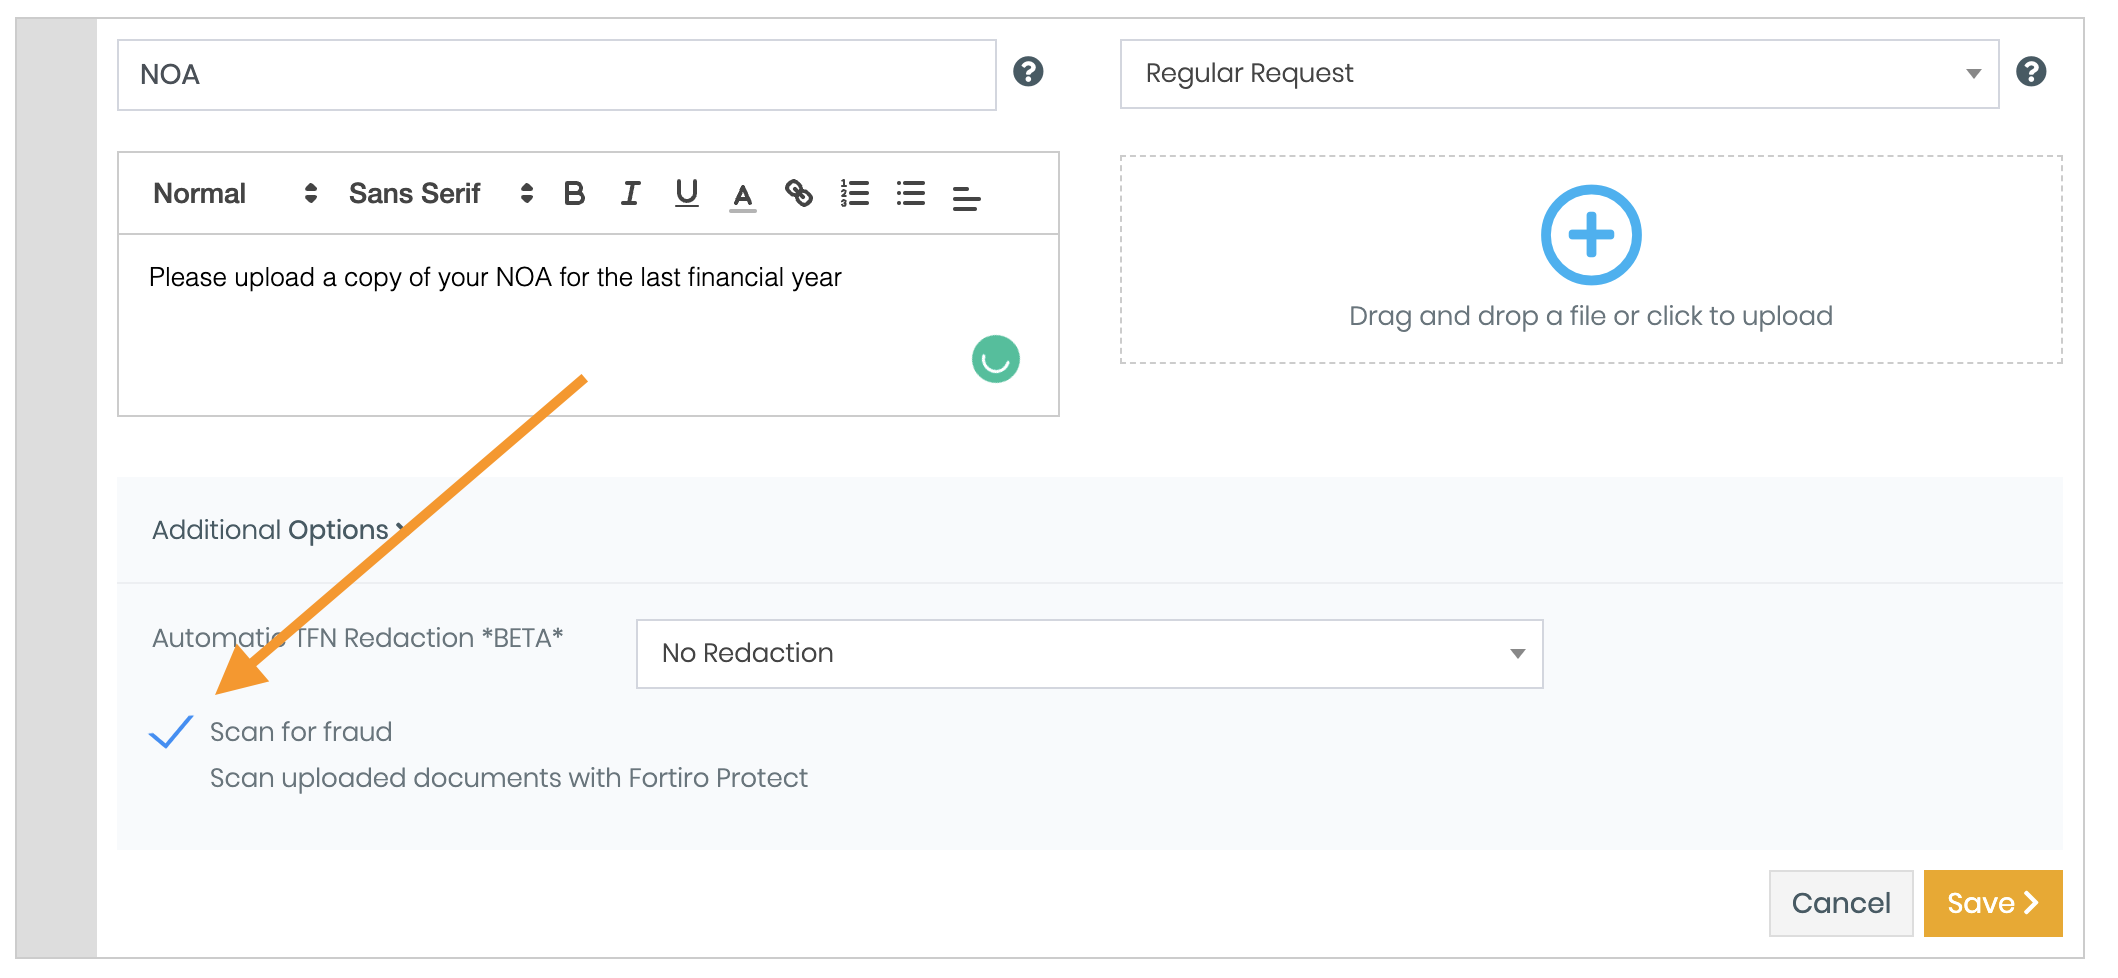
4. Ensure you save this Request.
5. Repeat the above on all Requests you'd like to enable fraud scanning for.
To enable when Creating Invites.
-
Create your Invite.
-
On the Requests Section either Add a new Request or click the Edit pencil beside an existing request.
-
Expand the Additional Options and then Enable the Scan for Fraud option.
4. Ensure you save this Request.
5. Repeat the above on all Requests you'd like to enable fraud scanning for.
Now when files are uploaded to these requests, they'll be included in any fraud scanning.

Scanning Documents for Fraud
Documents are scanned for Fraud in 3 ways
1 - Automatically once each Request, that has fraud scanning enabled, has had files uploaded.
Note: This scan occurs 30 minutes after the last file was uploaded to all fraud scan requests, if files are added within this 30-minute window, the 30 minutes resets.
2 - Manually through the Invites Requests section.
3 - Manually rescanned through the Invites Requests section.
This section goes through
-
Important Notes
-
Manually triggering a scan
-
Reviewing Scans (Including automatically triggered scans)
-
Accessing Scan report
-
Rescanning
-
Scan History
-
Handling maximum files limit hit
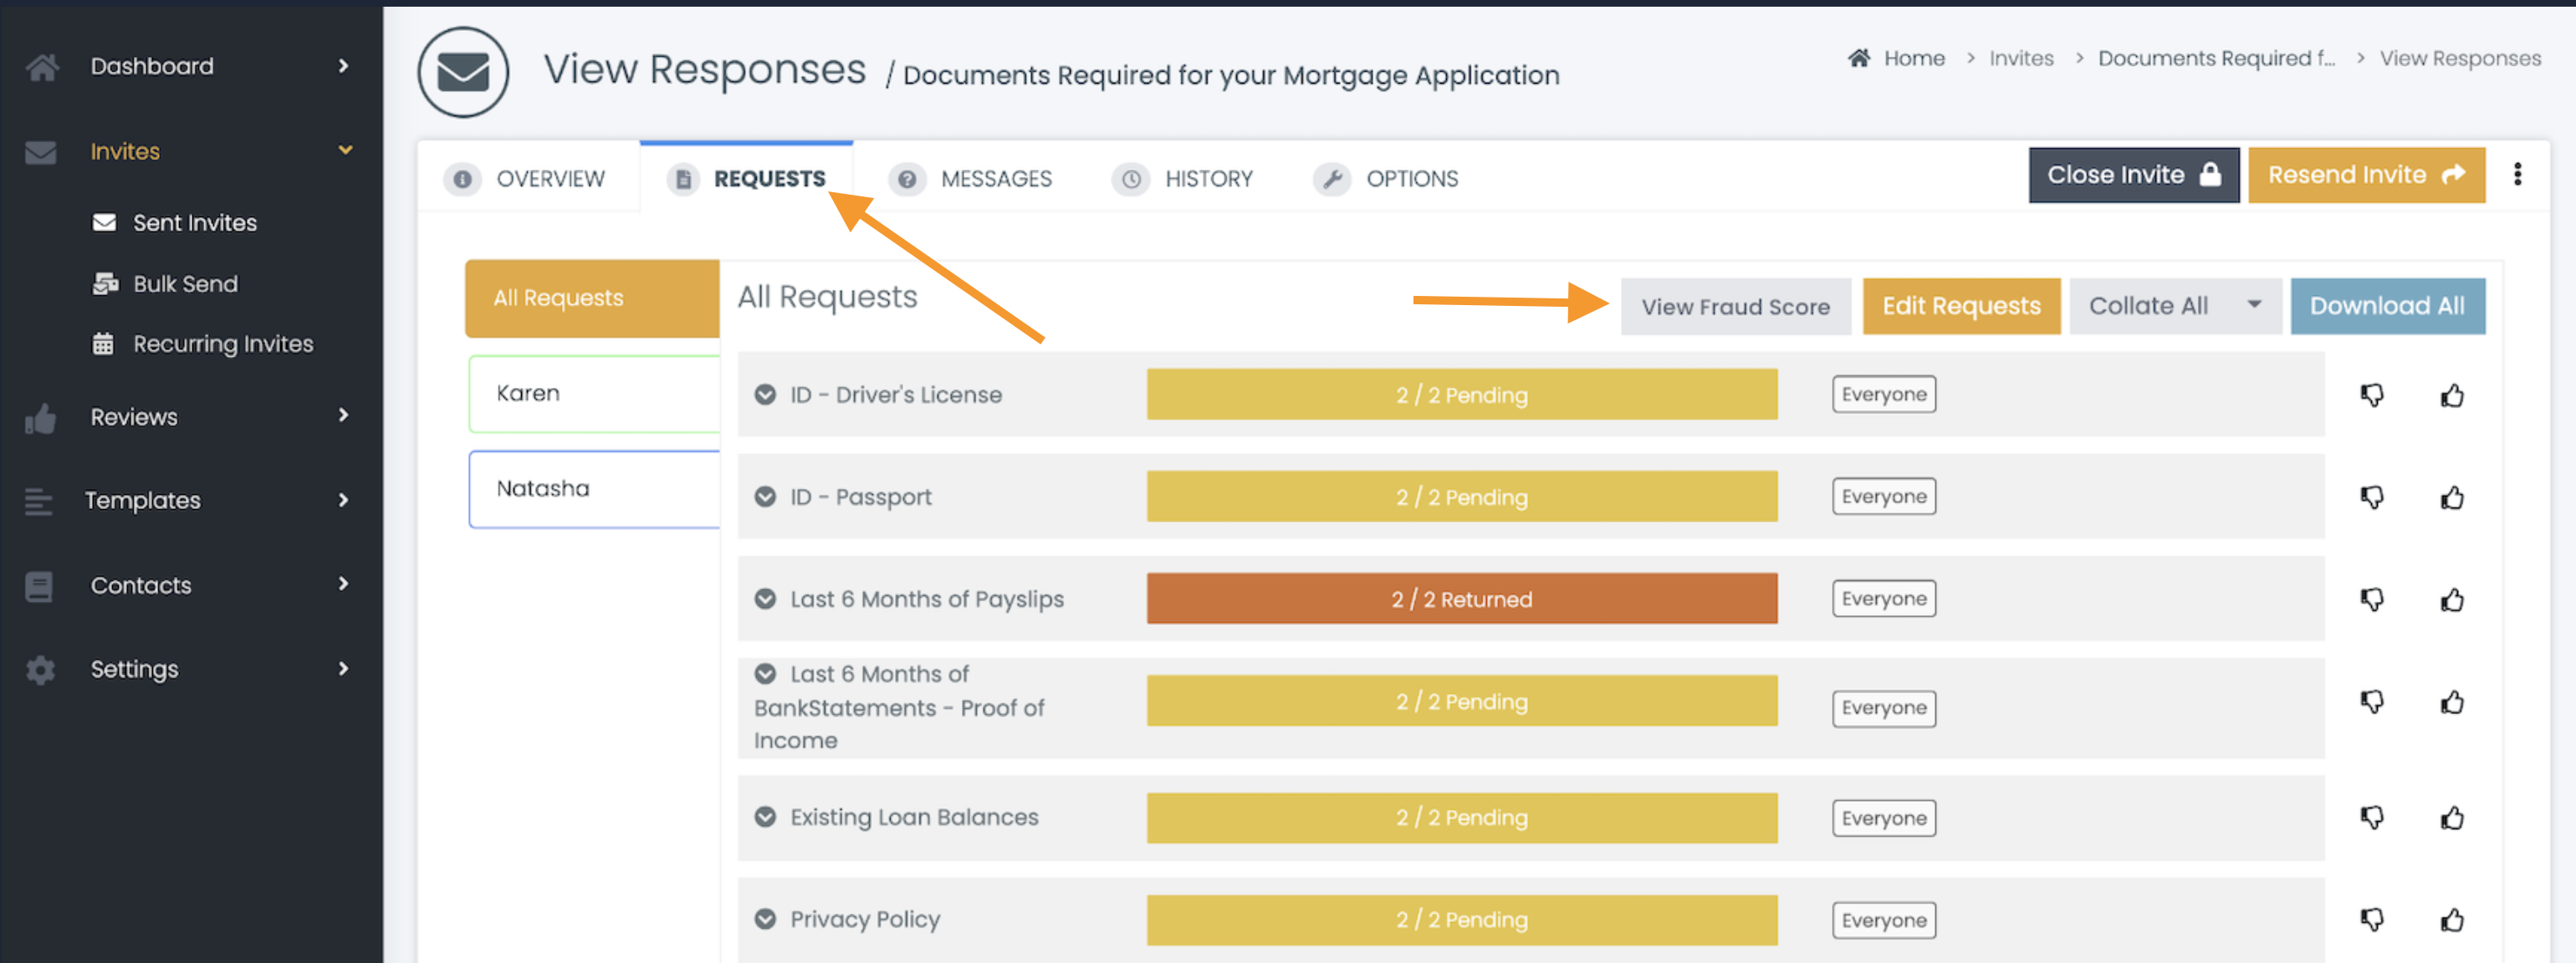
For each step, open the Invite to be scanned and navigate to its Request tab and click the View Fraud Score button.
Important Notes!
-
Any files returned via the Bankstatements.com.au integration will be excluded from the scan - due to them already being trustworthy documents.
-
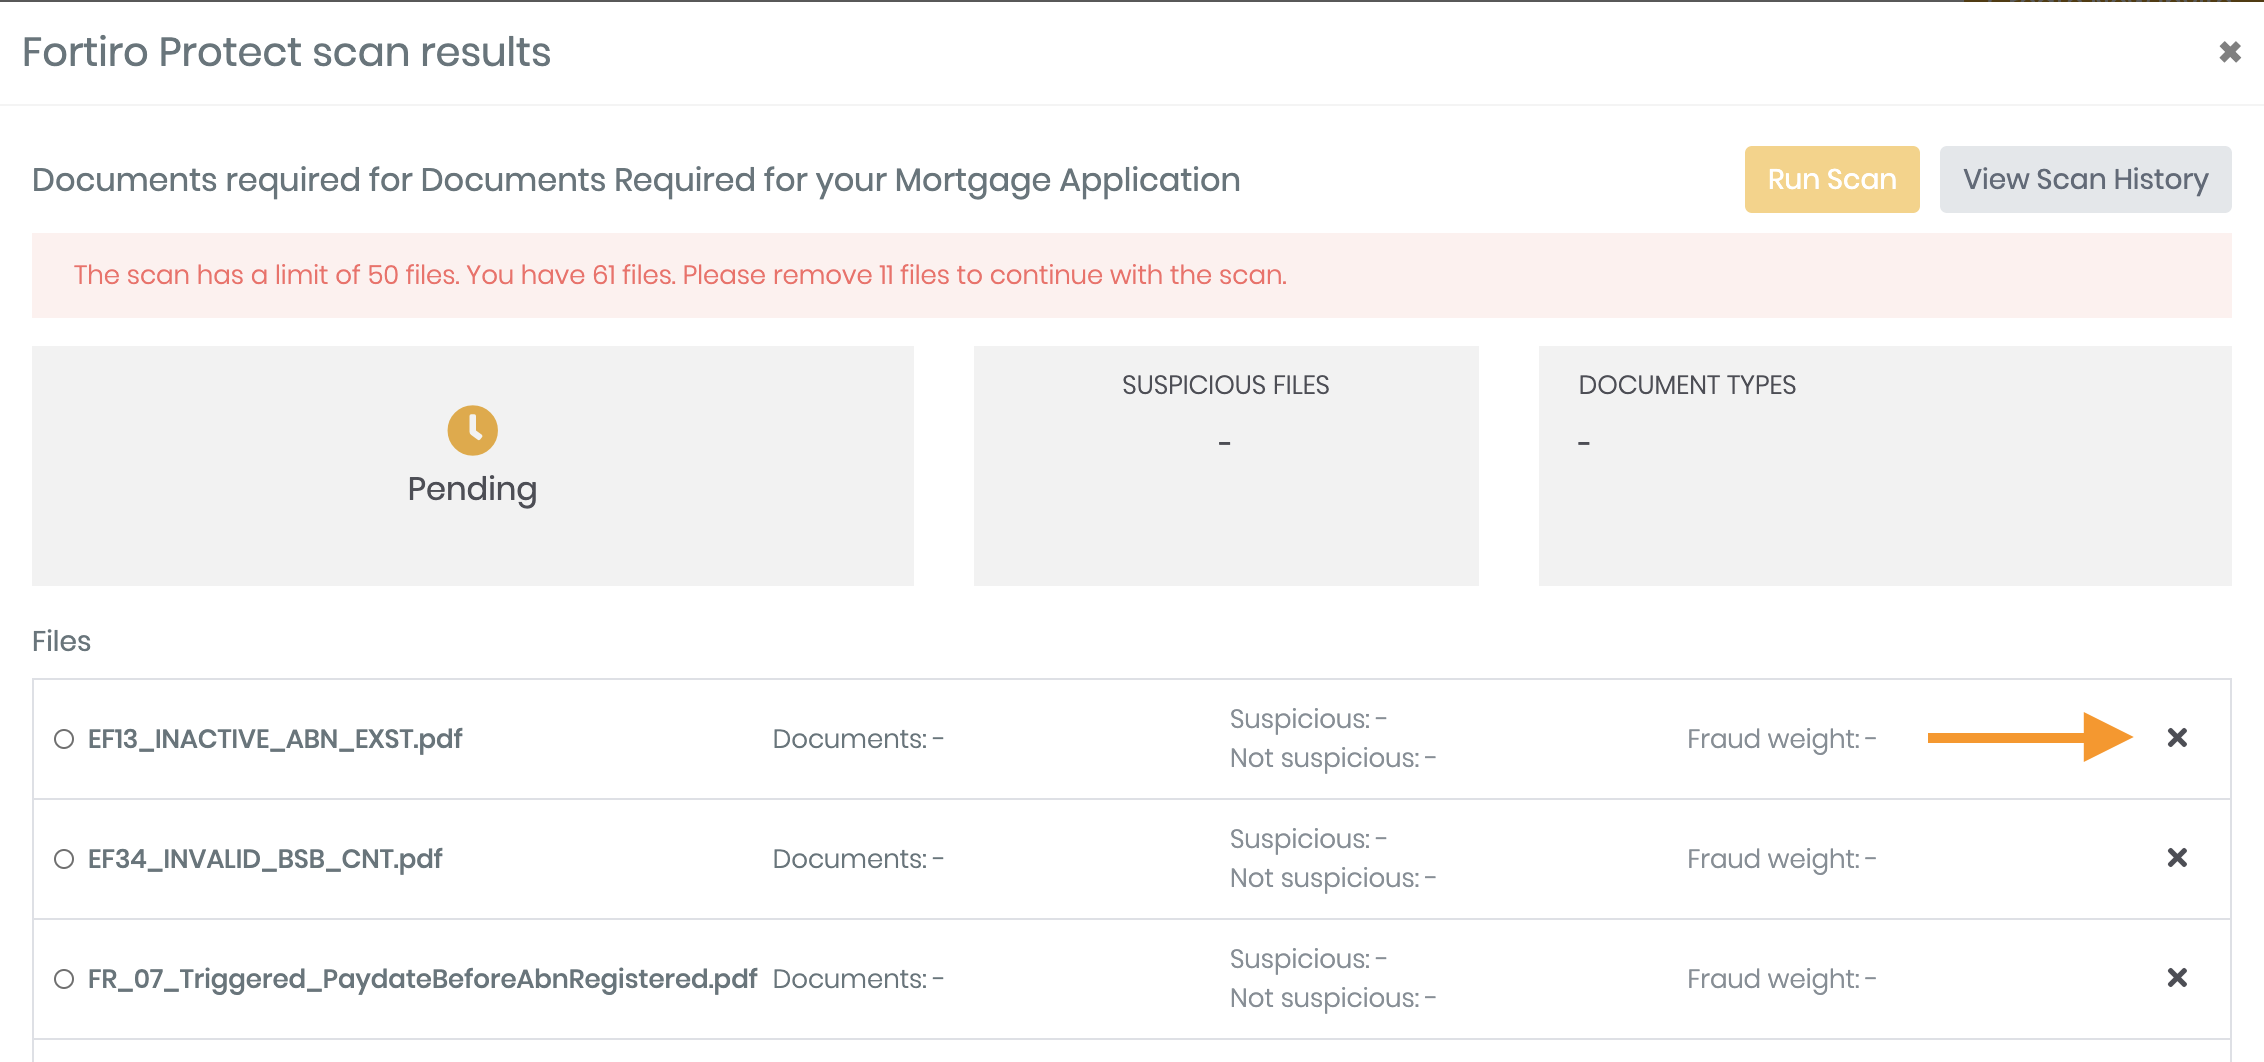
A scan can only have a maximum of 50 files - see at the end of this article how to handle this limit.
-
Files must be returned, to all requests on the invite that are enabled for fraud scanning, before auto scanning happens - see Manually Triggering a Scan to override this.
-
Auto scanning happens 30 minutes after the final file is uploaded to all fraud enabled Requests - if new files are uploaded within the 30-minute auto scanning window, the 30 minutes restart.
-
Please see the Supported Files at the top of this article for which documents can be scanned for fraud.
-
Each scan comes with a more comprehensive report that can be accessed from the Scan Results.
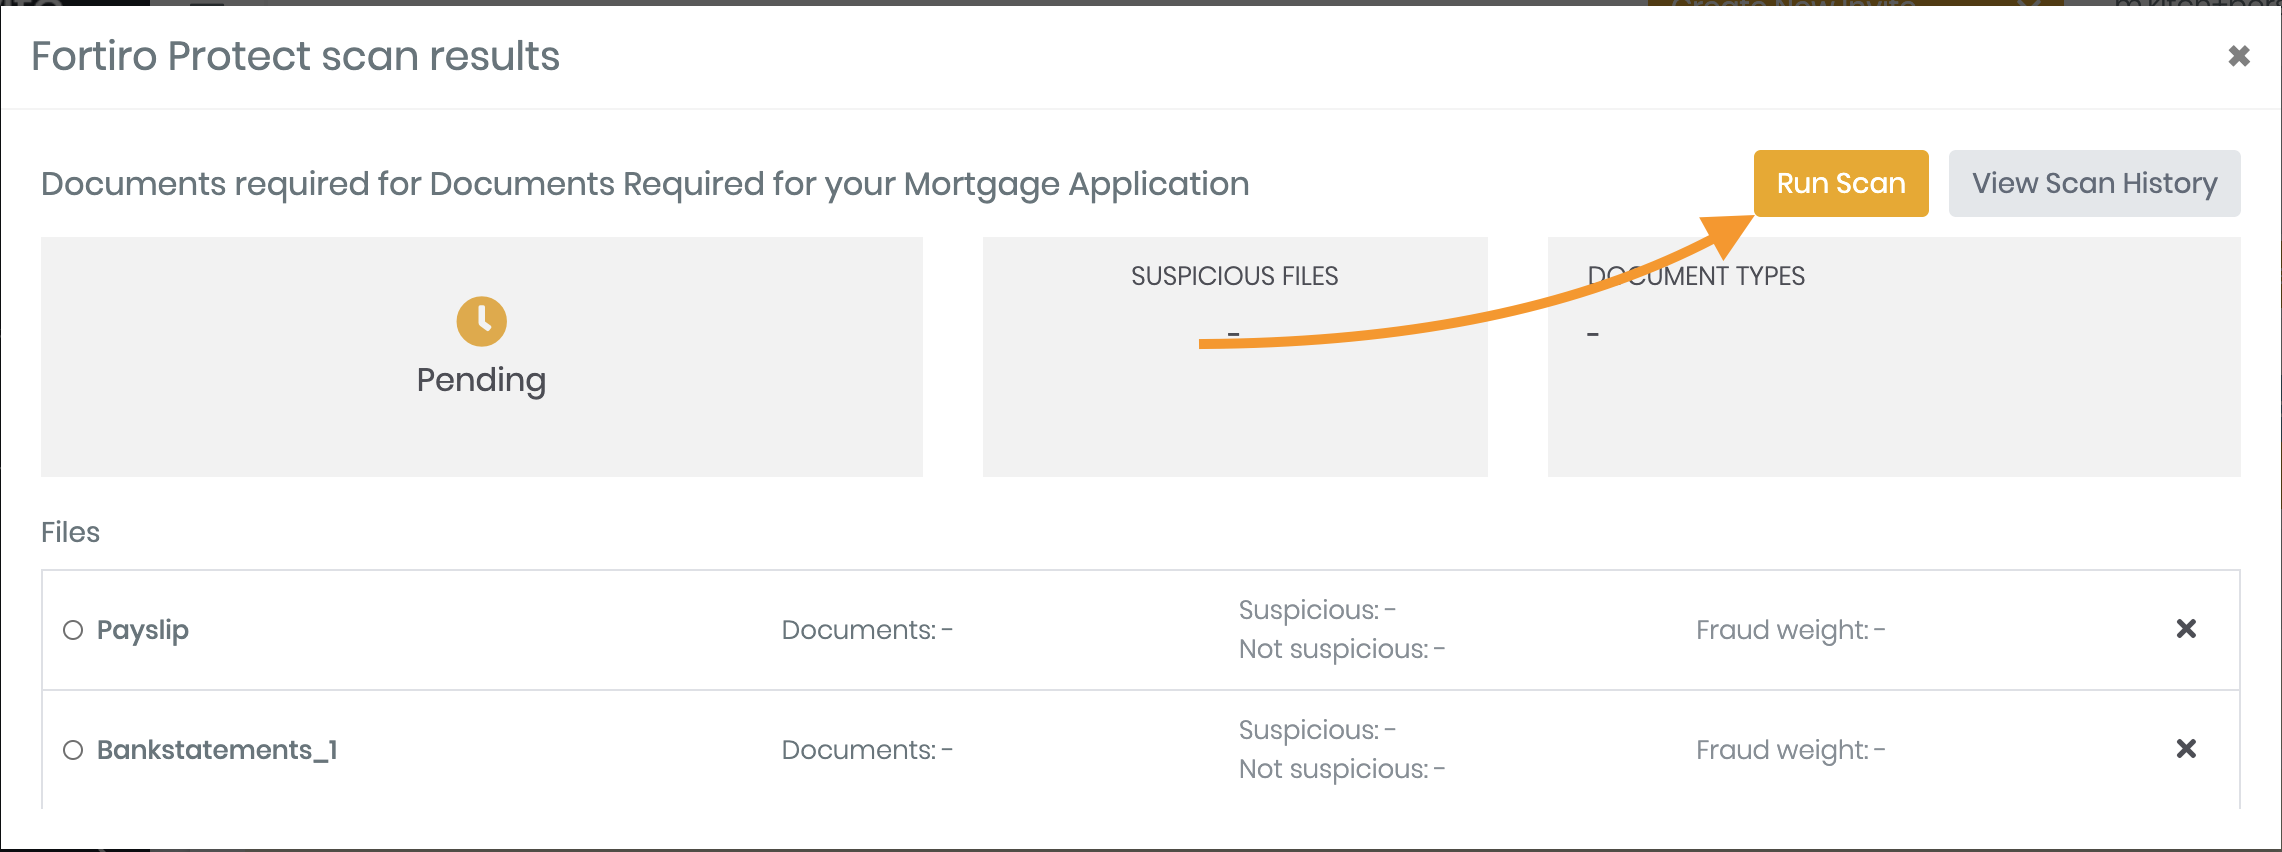
Manually Triggering a Scan
The scan will show as pending if it is still waiting for files to be added to requests.
Click the Run Scan button to manually trigger this scan.
Note: It takes approximately 10 minutes for a scan to complete - this can vary depending on service demand and you'll be emailed once it is complete.

Reviewing Scans (Including automatically triggered scans)
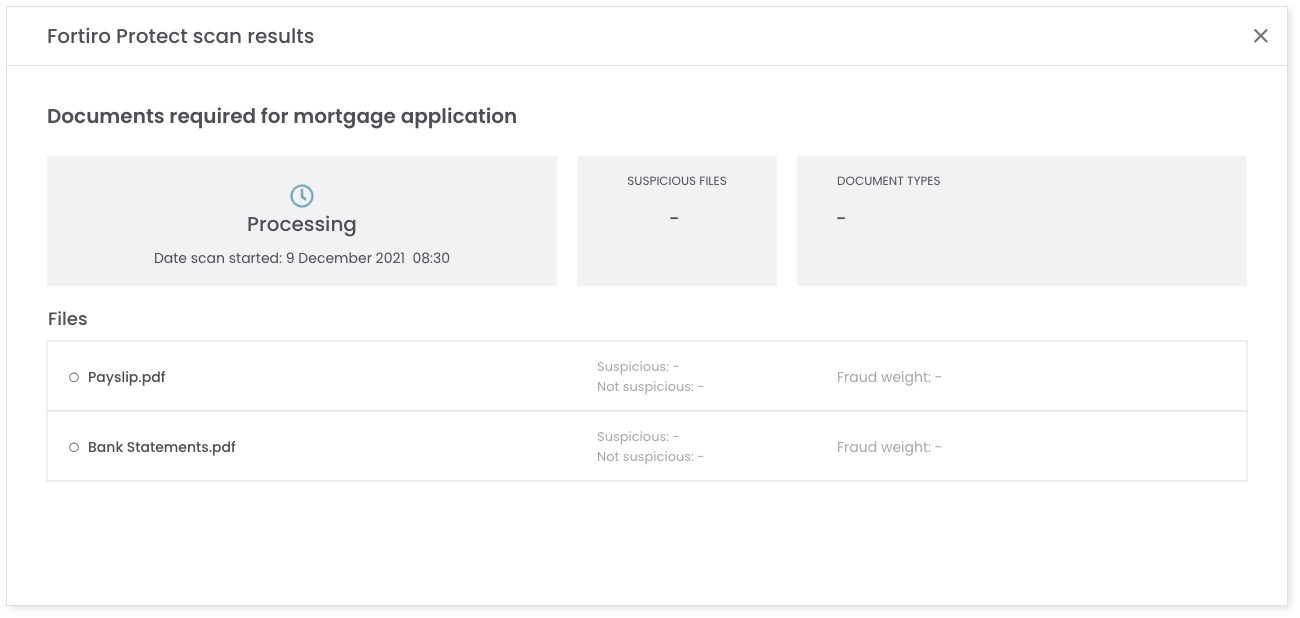
Whilst a scan is running, it will show the Processing status. You will receive an email notification when the scan is complete.
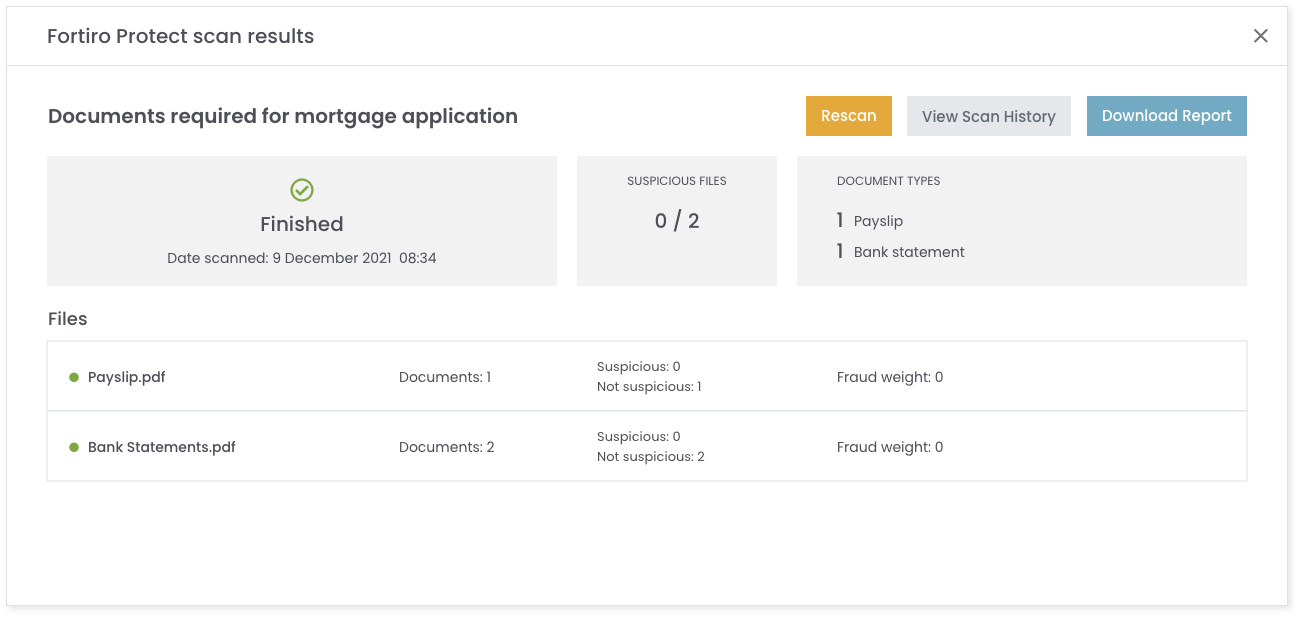
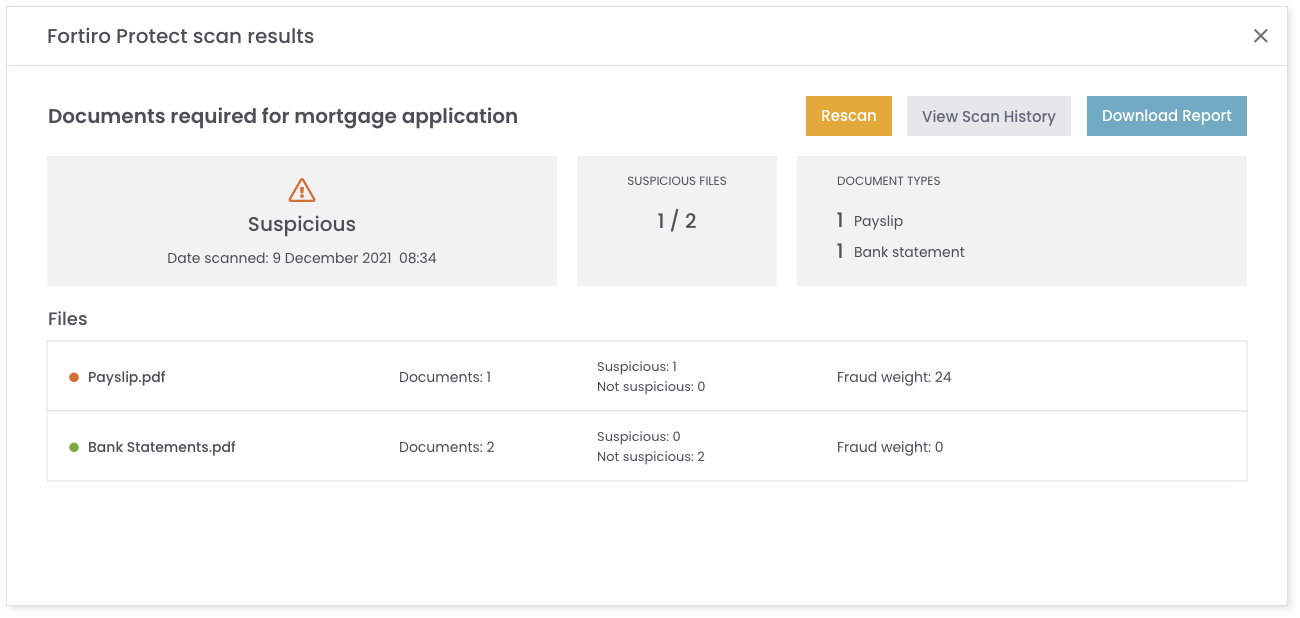
Once the scan is complete, its status will change to Finished OR Suspicious.
Review the scan results to see why the scan is Finished OR Suspicious.
The Scan Results show
-
Overall Scan status
-
Suspicious File Count
-
Document Types that have been identified
Each file shows
-
The count of documents found in the file
-
The count of suspicious vs non-suspicious documents found within the file
-
The Fraud weighting of that file
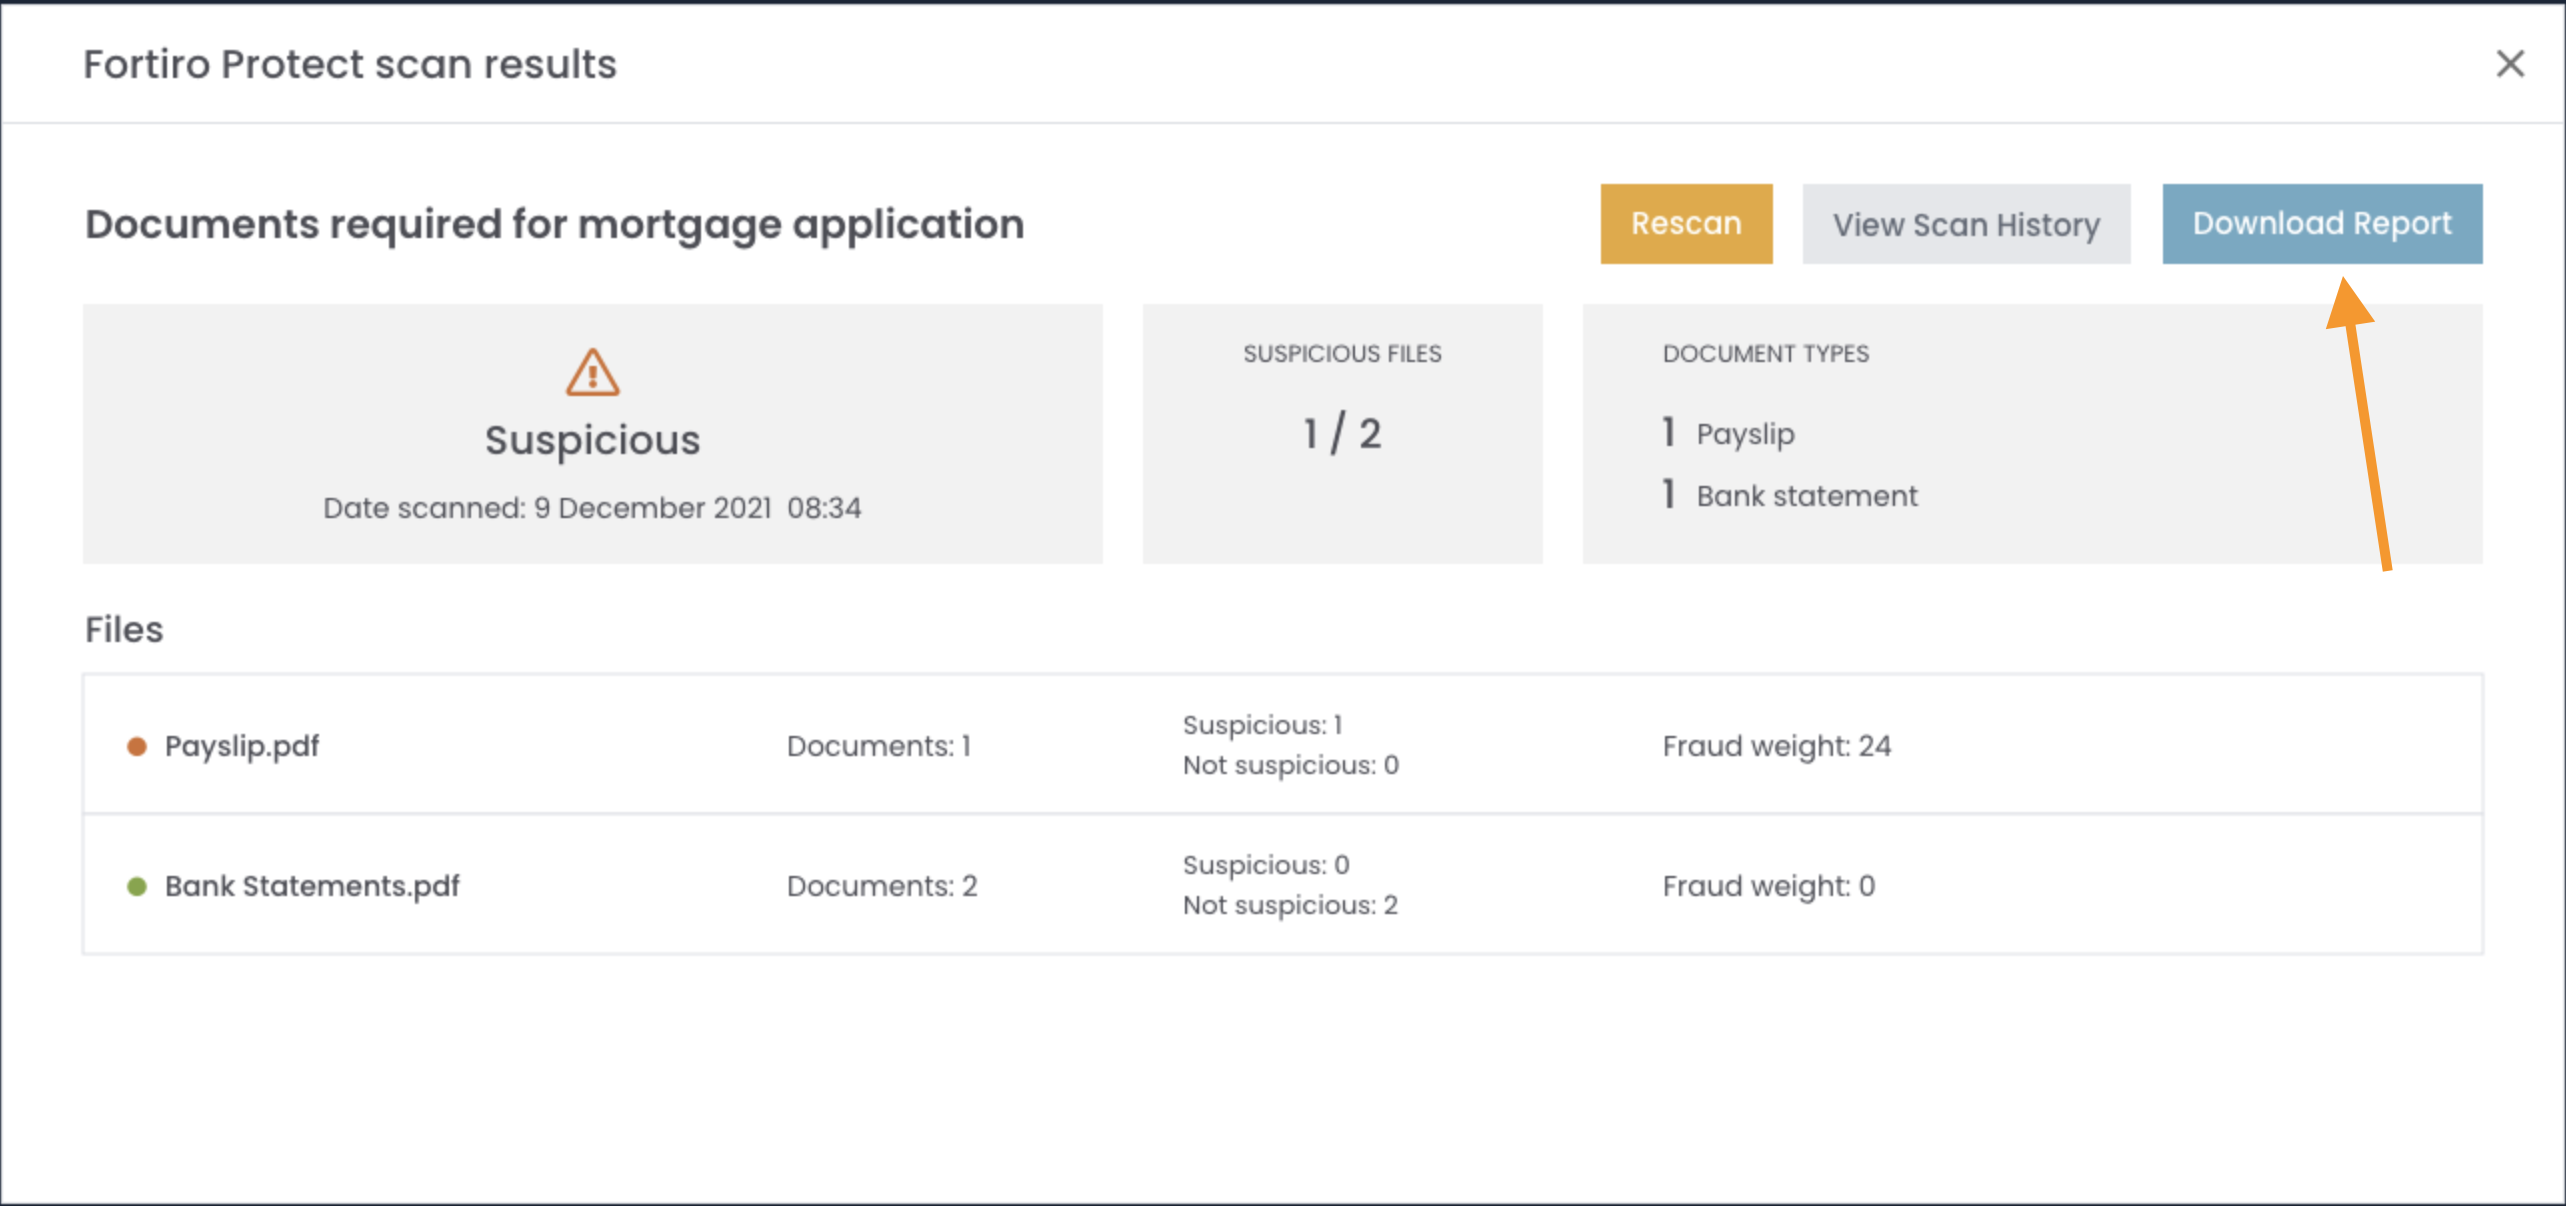
You can also Download the Report to see a more comprehensive analysis of the scan.
Finished - means the scan finished but there was nothing suspicious enough to flag.
Suspicious - means the scan finished and there were enough suspicious factors to flag the scan for review.
Accessing Scan report
Each scan comes with a comprehensive report. This breaks down the scan results in mode detail including:
-
Breakdown of the different documents found in each file
-
The Fraud rules triggered (i.e. the reasons for the fraud weighting)
Access the report by clicking the Download Report button on the scan results
Rescanning
Note: Depending on your Fortiro plan, you may be charged per rescan, so consider this when running rescans.
You can rescan an Invite to include new files if they were missed.
-
On the Scan Results, click the Rescan button, this puts the scan in pending mode
-
Here you can remove files from the scan, clicking the X beside each file
-
Click Run Scan to trigger the rescan to run
Your scan will now begin - see the Reviewing Scans section for more information on how the scan runs.
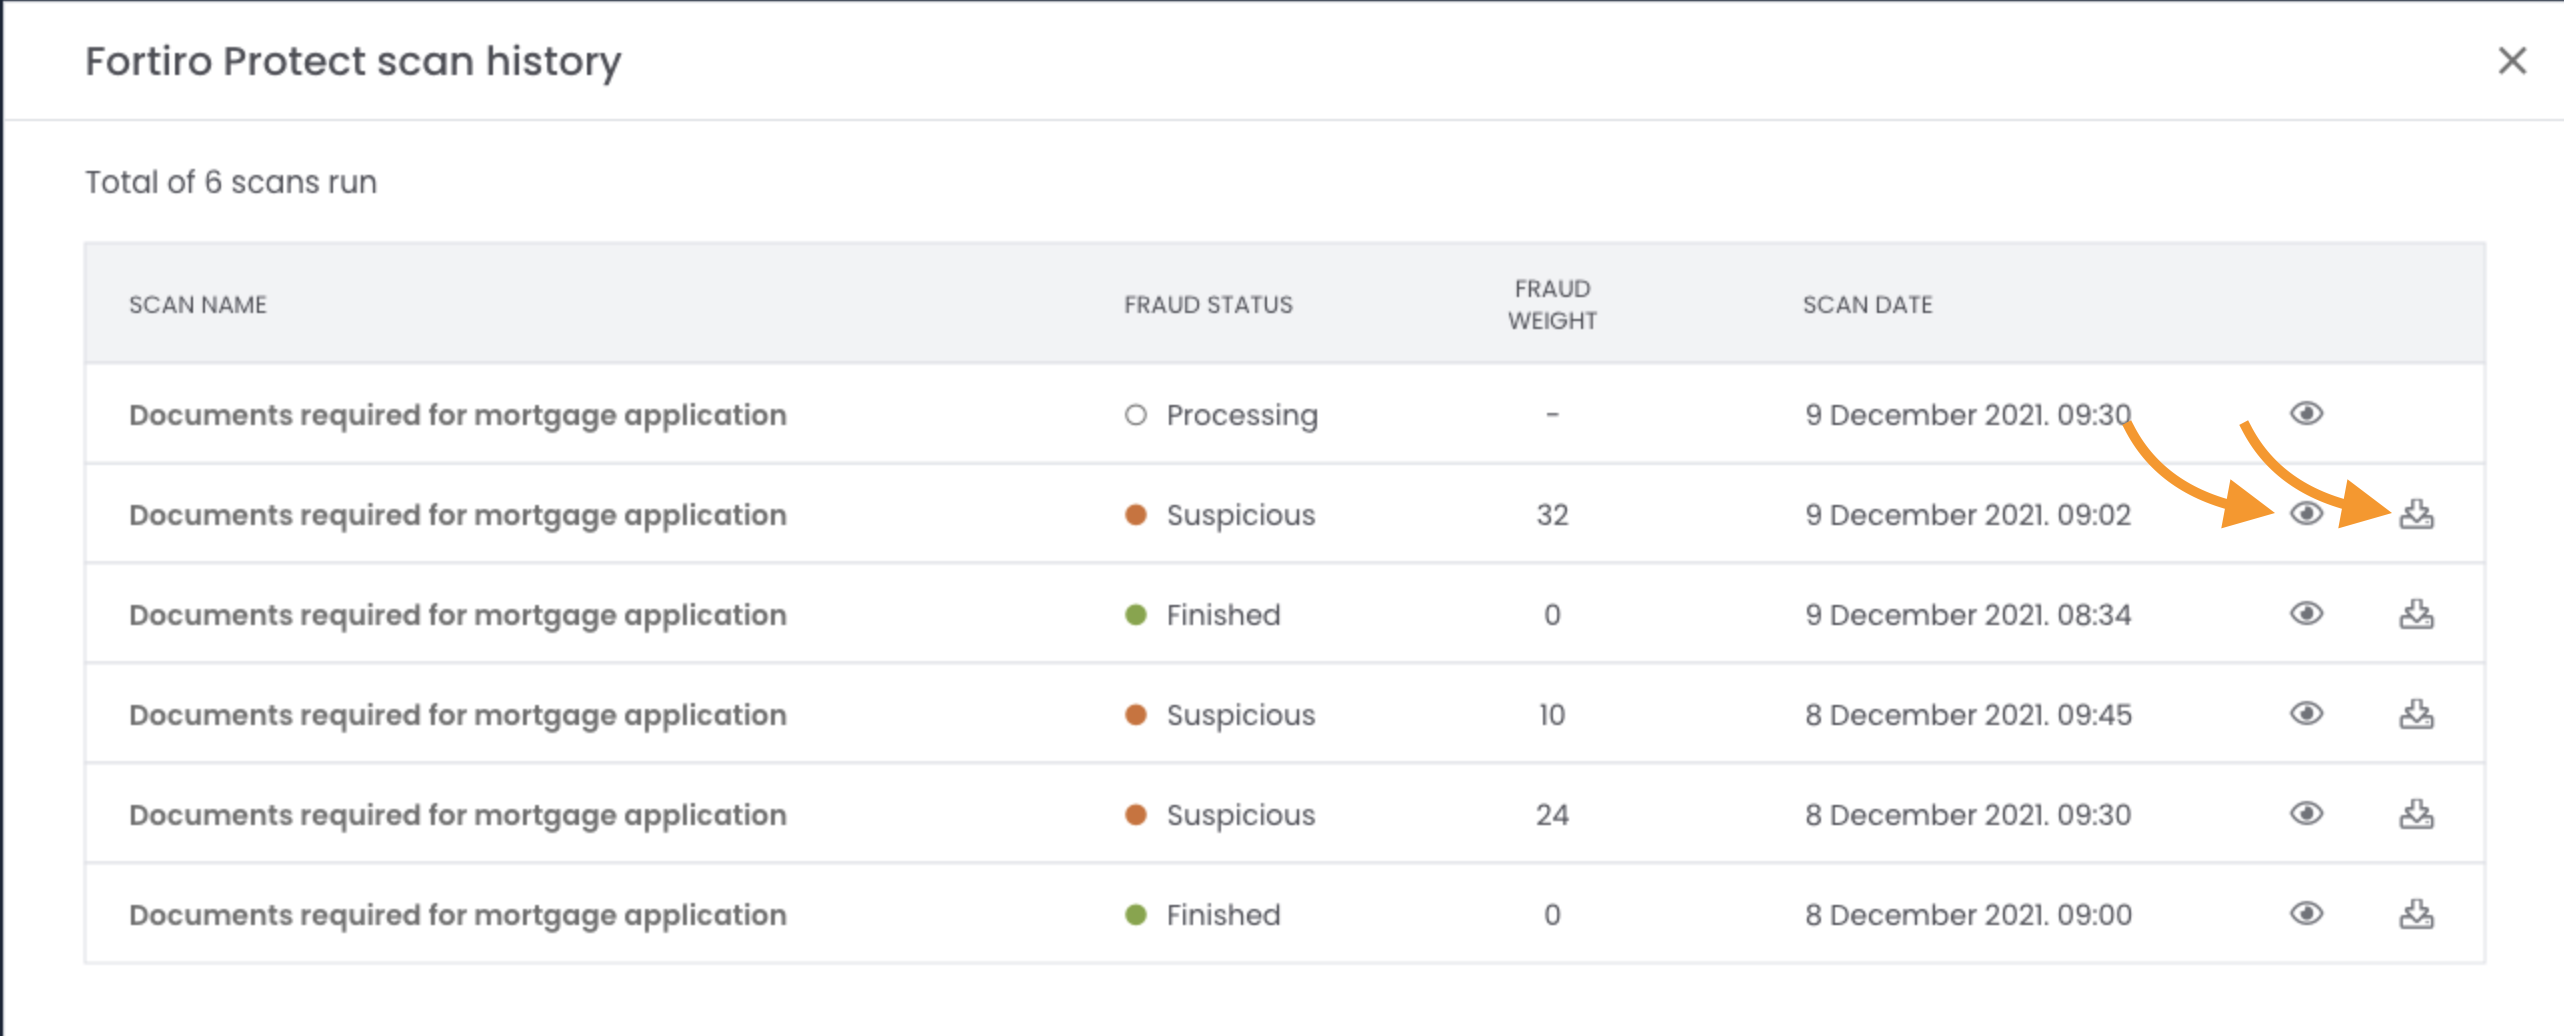
Scan History
When there are multiple scans under an Invite, you'll see the scan history, before your scan results.
Here you can
-
Click the Eye Icon to review the scan results.
-
Click the Download Icon to download the scan report.
Handling Maximum File Scan Limits
A scan handles a maximum of 50 files per scan. If you have more of these files associated with the scan, you'll need to remove files to reach this 50-file limit.
When you attempt to run the scan, you will see the file limit notice.
Beside each file, click the X to remove it from the scan until you have a maximum of 50 files. You will then be able to run the scan.