
If your Fileinvite Login URL ends in fileinvite.com, please use this knowledge base instead.
Overview of Invite Roles
Point of Contact
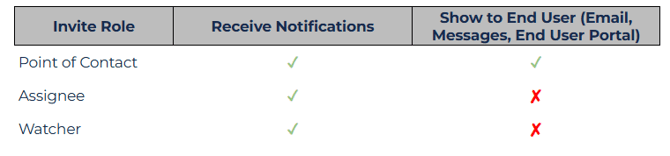
The Point of Contact serves as the primary interaction point for the end user.
-
Visibility: Their details are displayed in the customer portal, messaging, email communications, and on the Invite itself.
-
Notifications: They receive all Invite-related notifications, keeping them informed throughout the Invite’s lifecycle.
-
Flexibility: You can now assign or update the Point of Contact even after an Invite has been sent. These changes are automatically reflected in the End User Portal.
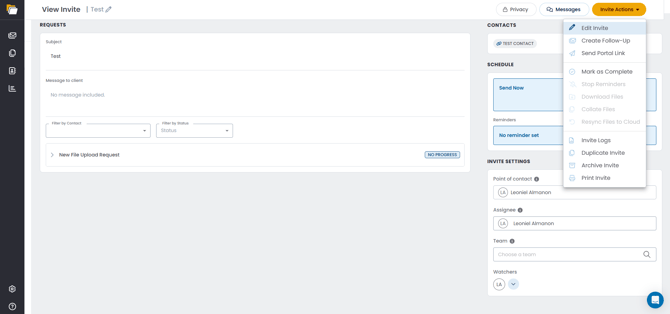
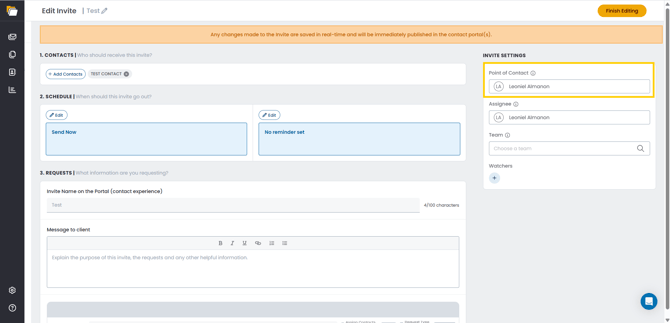
To change the Point of Contact for an invite, open the invite and click Edit Invite under Invite Actions
Assignee
The Assignee role is designed to allow another team member to work on the invite without being the primary contact.
-
Manual Addition: You can manually add yourself or another user as an Assignee, to indicate to your team that someone other than the Point of contact will also be working on the invite, and for that person to receive notifications for any invite they've been set as Assignee.
-
Notifications: Assignees receive updates about the Invite’s progress but are not visible to the end user.
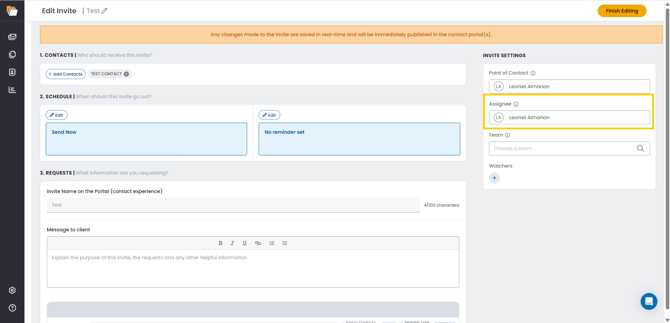
To add an Assignee to an invite, open the invite, click Edit Invite under Invite Actions, then click the box next to Assignee in the Invite Settings panel.
Watcher
The Watcher role is designed to keep team members informed about an Invite’s progress without being the primary contact.
-
Automatic Assignment: The user sending the Invite automatically becomes a Watcher if they designate another team member as the Point of Contact.
-
Manual Addition: You can manually add yourself as a Watcher to receive notifications for any sent Invite.
-
Notifications: Watchers receive updates about the Invite’s progress but are not visible to the end user.
To add yourself as a Watcher for an invite, open the invite and click the plus sign next to Watchers in the Invite Settings panel. This immediately adds you as a Watcher — no need to enter Edit Invite.
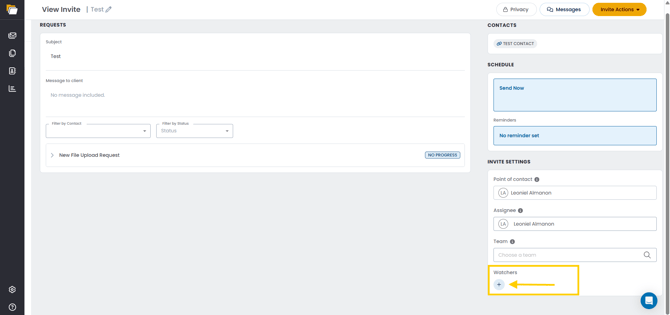
Note: This works directly from the View Invite screen — no need to enter Edit Invite. Adding a different team member as a Watcher works the same way and can also be done directly from View Invite, or from within Edit Invite under Invite Actions.
Add Entire Teams as Watchers
You can now assign an entire Team as Watchers.
When a team is added:
-
All team members are added individually to the Watchers list.
-
Each member receives notifications based on their own preferences.
To add a team:
- Add yourself as a Watcher by clicking the plus sign next to Watchers
- A dropdown arrow appears next to the Watcher avatars — click it to open the Watchers panel
- Use the Search team members or teams field to find the desired team
- Select the team from the list to add all its members as Watchers
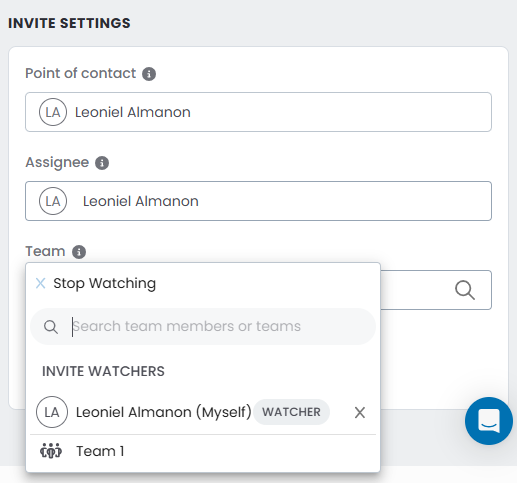
Note: This is different from the separate Team field in the Invite Settings panel, which is used to assign organizational ownership of the Invite (see Assigned Team below) — it does not add anyone as a Watcher.
Remove Watchers Functionality:
- Click the "X" next to any watcher's name
- Confirm the removal when prompted
- The removed user will no longer receive notifications for this invite
- Invite assignees can remove any watchers
- Account administrators can remove any watchers
Role Assignment During Invite Creation
- Assignee Field: Select the responsible team member
- Team Field: Choose the appropriate department
- Watchers Field: Add multiple team members for notifications
- Modify assignee, team, and watchers for existing invites
- Available for both sent and draft invites
- Changes take effect immediately
Assigned Team
Assign entire teams to Invites for better organization, ownership, and filtering.
How Team Assignment Works:
-
When creating or editing an Invite, locate the Assigned Team field.
-
Select from available teams in your organization.
-
Assigned teams gain organizational ownership of the Invite.
-
Users can filter Invites by team.
Benefits:
-
Clear Ownership: Establishes which team is managing the Invite.
-
Better Organization: Scales easily with large or complex teams.
-
Improved Filtering: Quickly sort Invites by team.
-
Accountability: Clarifies responsibility across workflows.
-
Portfolio Management: Useful for teams managing different loan types or regions.
Team Assignment vs. Other Roles
| Role | Purpose |
|---|---|
| Assigned Team | Team-level ownership & filtering |
| Point of Contact | Handles communication with the client |
| Assignee | Manages the Invite internally |
| Watchers | Observes progress (individual or team-level) |
💡 Best Practices:
-
Set clear rules for which team manages each loan type.
-
Ensure team permissions align with responsibilities.
-
Periodically review team assignments for accuracy.
Notification Preferences for Roles
Users now have full control over the notifications they receive based on their role.
Key Highlights:
-
Role-Based Control: Each user controls notifications independently of their Invite role.
-
Custom Preferences: Toggle alerts for Invite Sent, In Progress, Submissions, Due Dates, Ready for Review, and Portal Messages.
-
Location: Go to Settings > Notification Preferences
-
Master Toggle: Temporarily pause all notifications while preserving preferences.
🎉 You now have full flexibility over who's in the loop—assign the right people, add Watchers, and keep every Invite moving! 🎉