If your FileInvite Login URL ends in fileinvite.com, please use this knowledge base instead.
Overview
LiveForms provide an alternative to standard file upload requests. Instead of asking borrowers to upload documents, you can create interactive forms they fill out directly in the portal. This is ideal for collecting personal information, application details, or structured data where you need specific fields completed.
Key Features:
- Individual Forms: Each contact completes and signs their own separate form
- Shared Forms: Multiple contacts collaborate to complete and sign a single form
- Drag-and-drop form builder: Add text fields, checkboxes, radio buttons, combo boxes, date fields, and signature fields
- Customizable properties: Control field appearance, validation, and behavior
- PDF-based: Upload existing PDF forms and add interactive fields
Getting Started
Before creating a LiveForm, you'll need to open an existing Invite or template, or create a new one.
Steps to Create a LiveForm
1. Navigate to the Request
Once you have your Invite or template open:
- Scroll to the Request Group where you want to add a LiveForm
- Click to expand the Request Group if it's collapsed
- Locate an existing request you want to convert, or prepare to add a new request
2. Access the Request Type Dropdown
From within your Invite creation or editing screen:
- Locate the Request Type dropdown on any request
- Click the dropdown to reveal the available options: File Upload, Form, and Read Only

3. Select Form as Request Type
- Select Form from the Request Type dropdown
- The request interface will update to show form-specific options
- You'll see a text area with placeholder text: "Add a description or instructions for the form"
- A file upload area will appear with the text "Drag and drop a file or click to upload"

4. Upload Your PDF Form
Before choosing the form collaboration type, you need to upload your PDF:
- Click the file upload area that displays "Drag and drop a file or click to upload"
- Browse to select your PDF file, or drag and drop it directly onto the upload area
- The system will process your PDF and prepare it for field addition
Important Notes:
- You can upload a blank PDF or an existing form with fillable areas
- Maximum file size: 100MB
- Supported file type: .pdf only
- If you don't have a PDF ready, you can create a simple form document first
5. Choose Form Collaboration Type
After uploading your PDF, a Create Form dialog will appear with two options:

Individual Form
- Each contact will fill and sign their own form
- Best for: Personal information, individual applications, separate declarations
- Each borrower receives a unique copy to complete
Shared Form
- Multiple contacts fill and sign the same form
- Best for: Joint applications, household information, collaborative documents
- All borrowers work on a single shared document
Select the appropriate option based on your needs by clicking the corresponding Select button.
6. Build Your Form
Once you've selected the form type, you'll enter the form builder interface:

The form builder provides several field types in the left sidebar:
ADD FIELDS section:
- Text Field: Single or multi-line text input
- Check Box: Yes/no or multiple selection options
- Radio Button: Single selection from multiple options
- Combo Box: Dropdown selection list
- Date Field: Date picker with format options (US format: MM/DD/YYYY)
SIGNATURES section
- Signature: Electronic signature field
- Signature with Date Signed: Signature with automatic date stamp
- Date Signed: A custom field that automatically captures when a form is signed (use this separately from signatures when you need to track signing dates independently)
- Initial: Initials field
Persistent Signatures: When signing forms, your signature and initials ca saved and reused across multiple signature fields on the same form. This means you only need to create your signature once, then apply it to all required signature fields without redrawing it each time.
To use persistent signatures:
- Create your signature in the first signature field
- The system will save this signature automatically
- For subsequent signature fields, select "Use saved signature"
- Your signature will be applied instantly
Date Format Options: When adding date fields to your forms, you can now choose from multiple date formats to match regional requirements:
- MM/DD/YYYY (US format)
- DD/MM/YYYY (International format)
- YYYY/MM/DD (ISO format)
To configure date format:
- Click on a Date Field in your form
- Open the field properties panel
- Select your preferred format from the "Date Format" dropdown
- The date picker will automatically display dates in the selected format
To add fields to your form:
- Drag a field type from the left sidebar
- Drop it onto the desired location on your PDF
- The field will appear as a blue highlighted box on the form
- Resize box as needed
7. Configure Field Properties
Click any field on the form to open its properties panel:
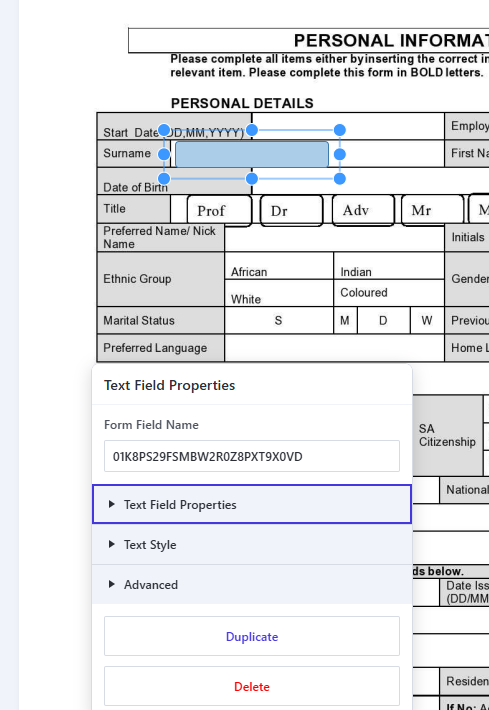
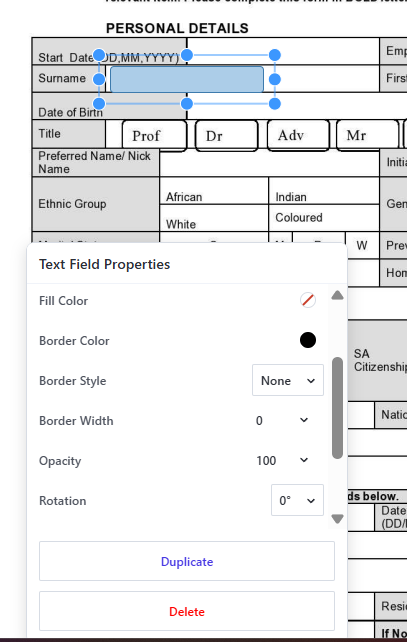
Text Field Properties:
- Form Field Name: Internal identifier (auto-generated)
- Fill Color: Background color of the field
- Border Color: Outline color
- Border Style: None, Solid, Dashed, etc.
- Border Width: Thickness in pixels
- Opacity: Transparency level (0-100)
- Rotation: Field orientation (0°, 90°, 180°, 270°)
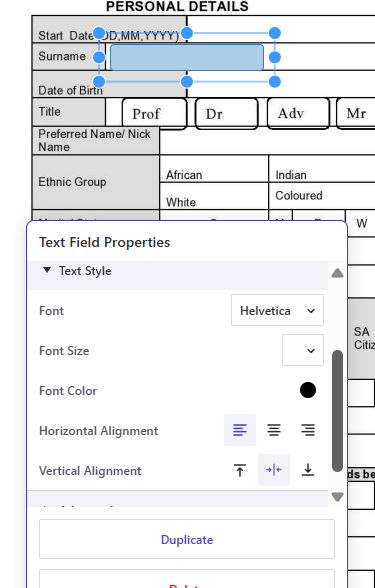
Text Style Options:
- Font: Choose from available fonts
- Font Size: Adjust text size
- Font Color: Text color
- Horizontal Alignment: Left, center, or right alignment
- Vertical Alignment: Top, middle, or bottom alignment
Advanced Options:
- Creator Name: Track who added the field
- Note: Add internal notes about the field
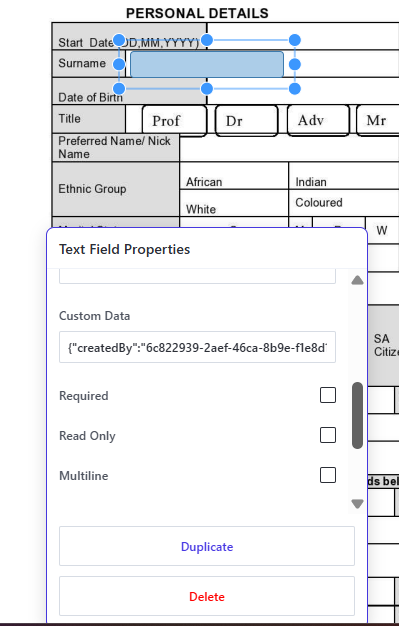
- Custom Data: Store additional metadata (displayed as JSON)
- Required: Make field mandatory for form submission
- Read Only: Display information without allowing edits
- Multiline: Allow multiple lines of text input
- ID: Unique field identifier (auto-generated)
- Created At: Timestamp of field creation
- Updated At: Timestamp of last modification
The Required checkbox ensures borrowers cannot submit the form without completing this field. Use this for critical information.
8. Add Signature Fields
For forms requiring signatures:
- Drag a Signature, Signature with Date Signed, or Initial field from the SIGNATURES section
- Position it in the appropriate location on your form
- Configure signature properties as needed
Important Notes:
- Signatures are legally binding electronic signatures
- Each contact must complete signature fields before form submission
- Forms with signatures cannot be edited after submission without clearing the signature
8.1. Configure Typed Signatures
Borrowers can also type their signatures directly in LiveForms instead of drawing them, making it easier to sign on mobile devices or for borrowers who prefer typing.

Enabling or Disabling Typed Signatures
By default, all signature fields allow both drawn and typed signatures. To change this setting:
- Look for the Allow type signatures checkbox at the bottom of the SIGNATURES section in the left sidebar
- Check the box to enable typed signatures (checked by default)
- Uncheck the box to disable typed signatures if your compliance policies require drawn signatures only
Important Notes:
- The typed signature setting applies to all signature fields on the form
- Existing forms automatically have typed signatures enabled by default
- You can disable typed signatures if your compliance policies require drawn signatures only
How Borrowers Use Typed Signatures
When typed signatures are enabled, borrowers see two options when clicking a signature field:
Draw Tab:
- Traditional signature drawing with finger or stylus
- Best for devices with touch screens or stylus support
Type Tab:
- Enter their name in the text field (placeholder shows "Signature")
- Choose from four different signature font styles
- Preview their typed signature before confirming
- Select Save Signature to reuse across multiple signature fields

Signature Customization:
- Font Selection: Choose from four professionally styled signature fonts
- Persistent Signatures: Check Save Signature to automatically apply the same signature to all remaining signature fields on the form
- Easy Switching: Borrowers can switch between Draw and Type modes before confirming their signature
💡 Best Practice: Leave typed signatures enabled to reduce friction on mobile devices where drawing signatures can be difficult. Only disable if your organization's compliance requirements mandate handwritten-style signatures.
Regulatory Compliance Features
Completed ID Footer: For regulatory compliance, all Live Forms now automatically display a Completed ID on every page. This identifier helps meet audit and documentation requirements by providing:
- Unique form identification
- Completion tracking
- Audit trail support
The Completed ID appears at the bottom of each page and is automatically generated when the form is completed and signed.
Digital Certificate Document Name: Digital certificates now display the specific request name as the document name, rather than the Invite subject. This makes it easier to identify which document a certificate belongs to when an Invite contains multiple signature requests.
9. Duplicate and Delete Fields
To speed up form creation:
- Duplicate: Click the Duplicate button in the field properties panel to create an identical copy
- Delete: Click the Delete button (shown in red) to remove a field
10. Save Your LiveForm
Once you've finished building your form:
- Click the Save & Close button in the top-right corner
- Your form will be saved and attached to the request
- The form will be available to borrowers when they access the Invite

11. Add Form Description (Optional)
Back in the request editing view:
- Add instructions or context in the description field
- This text will appear above the form in the Client Portal
- Provide clear guidance on what information borrowers should provide
Editing an Existing LiveForm
If you need to modify a LiveForm after saving it:
- Navigate to the request containing your LiveForm
- In the Form section, locate your uploaded PDF
- Click the Edit Form Fields button
- The form builder will open, allowing you to add, remove, or modify fields
- Make your desired changes
- Click Save & Close when finished

Note: You can edit LiveForms at any time before sending the Invite to borrowers. Once the Invite is sent, changes to the form may affect borrowers who are already completing it.
💡 Best Practices:
- Test your form by previewing it before sending to borrowers
- Use clear, descriptive field names that match the PDF labels
- Make only essential fields required to reduce friction
- Group related fields using visual spacing or PDF design
- Include instructions for complex forms in the description field
Form Types in Action
Individual Forms: When borrowers receive an Invite with an Individual Form request, each contact will:
- See their own unique copy of the form
- Complete fields independently
- Sign the form separately
- Submit without seeing other contacts' responses
Shared Forms: When borrowers receive an Invite with a Shared Form request, all contacts will:
- Access the same form document
- See fields completed by other contacts in real-time
- Collaborate on filling out information
- Add their signatures to the shared document
- Submit together once complete
Final Steps Before Sending
After creating your LiveForm:
- Review all other requests in the Invite
- Verify contact information and roles
- Set appropriate due dates
- Add any necessary messages or instructions
- Send the Invite to borrowers
🎉 Success! Your LiveForm is now ready to be completed directly in the Client Portal! 🎉